A simulation of handling a camera

Learn the machine.
Then take the picture.

SimCam is a chance to handle a camera the long way round: the exposure triangle, a night built by stacking, focus aids from a serious digital body, and a roll of film you have to finish. The picture is what that handling earns. It stays close to the physical world, and it stays a simulation.

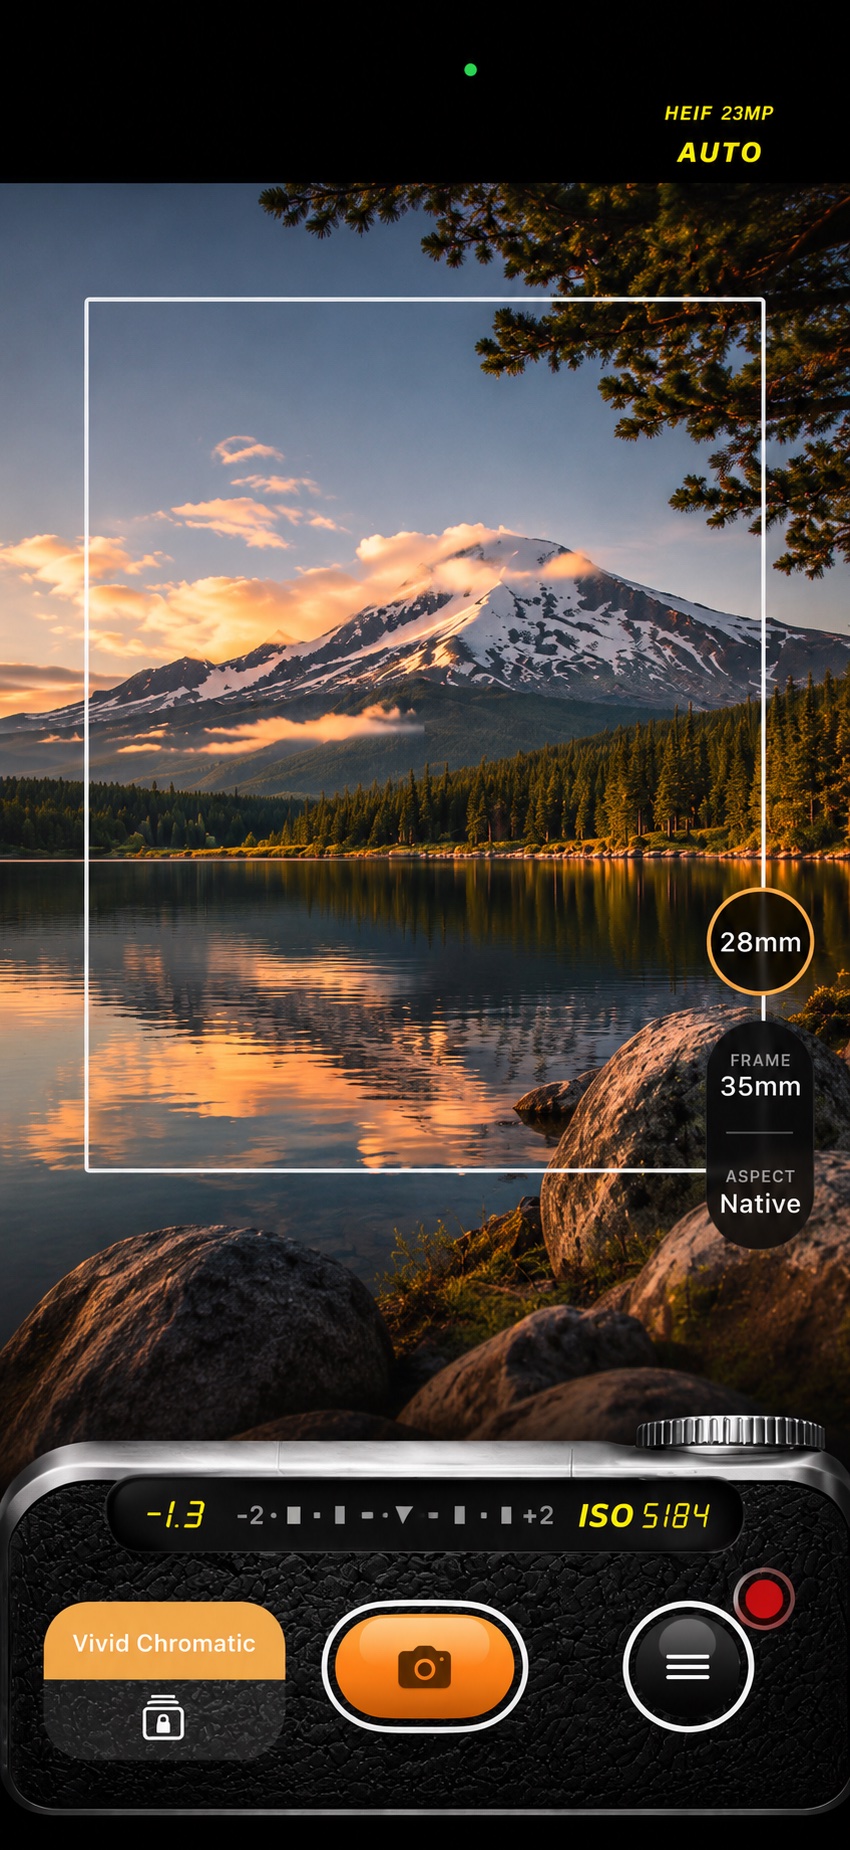
SimCam in portrait: a mountain lake at golden hour with the 35 mm frame line, the 28 mm lens button and the LED metering bar
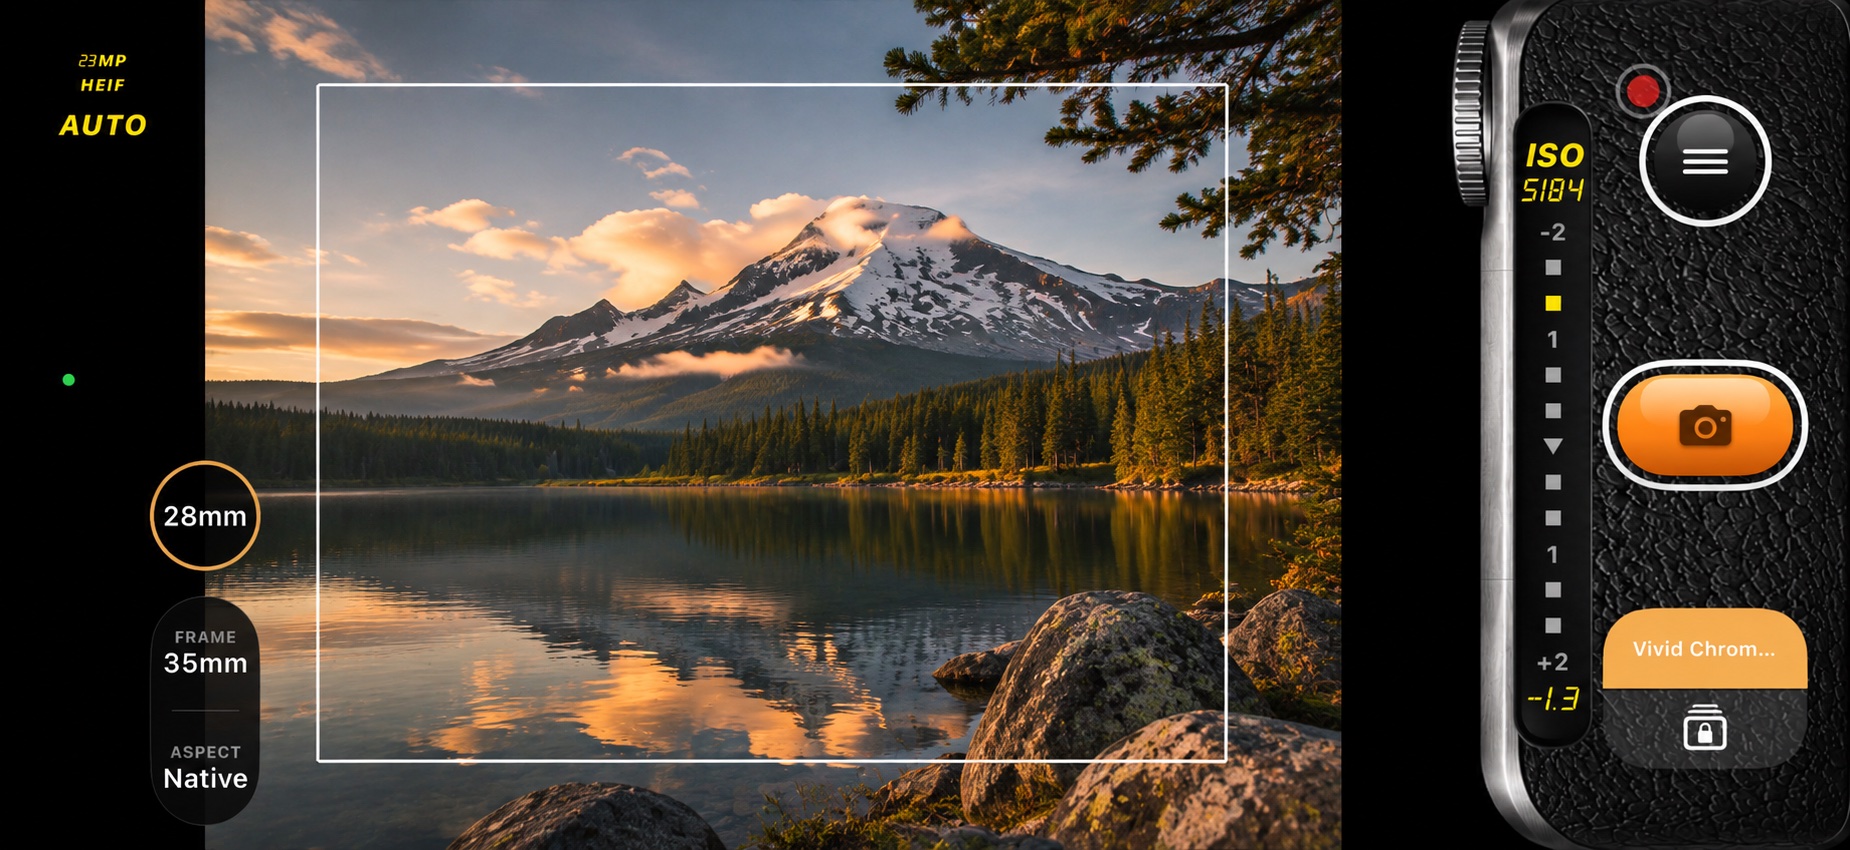
SimCam in landscape: the same mountain lake with the vertical metering bar and shutter on the camera body skin
  • Exposure triangleAperture, shutter, ISO
  • Focus craftPeaking and a closer look
  • A roll of film135, half frame, the sheet
  • Camera colourA pipeline close to firmware
  • Night, stackedCleaner dark, or light trails

Why "Sim-Cam"

The name is the whole idea. SimCam simulates the experience of a camera: the machine in your hand, and the way a photographer works it.

Phones differ, so this is a handling you practise. Night is the long craft of a dark picture: a stack that quiets the noise, trails when the city should draw with light, and a flash that waits for the end of a slow shutter. Focus is the craft of a premium digital body, with assistants that help you see whether the point is sharp. Exposure is the triangle photographers already know, marked in the thirds of a stop a real dial uses.

Film is the other machine. The catalog holds full-frame 135 and half frame, each format a crop of its own, so further sizes can join the same way. A date stamp, a contact sheet, and a choice of analog bodies, each with its own strength: a vignette that belongs to that lens, or a roll loaded onto that camera and kept there until it is finished. Colour is the pipeline inside a digital camera's firmware, followed closely enough that a look can stand in for that body's way of seeing. Every one of these is a simulation, brought close to the physical world, and kept as a simulation.

140+Film looks, from camera colour to film stocks
7Focal lengths, 13 to 120 mm
⅓Stop steps for aperture, shutter and ISO
25,600Extended ISO, pushed in the RAW development
7Drive modes, including Portrait, Night, ND, time-lapse and video
7Camera body skins, from Classic to Story

In use

Hold it like a camera.
In either direction.

The first simulation is the grip. Turn the phone and the controls move to the side, the way a body puts its dials under the right hand, and every label stays upright. Photo mode keeps a 4:3 picture with the meter beneath it. Video opens the full 16:9 frame. The hold itself is part of the simulation: the same body, the same dials, whichever way the picture is framed.

SimCam held upright: a mountain lake at golden hour with the 35 mm frame line, and the metering bar and shutter row on the camera body skin
SHOT 01 · Photo · Portrait On the 28 mm lens, the 35 mm frame line marks the picture, and you can see what's just outside it. The LED meter reads −1.3 EV at ISO 5184, the format readout shows HEIF 23MP, and Vivid Chromatic sits next to the shutter.
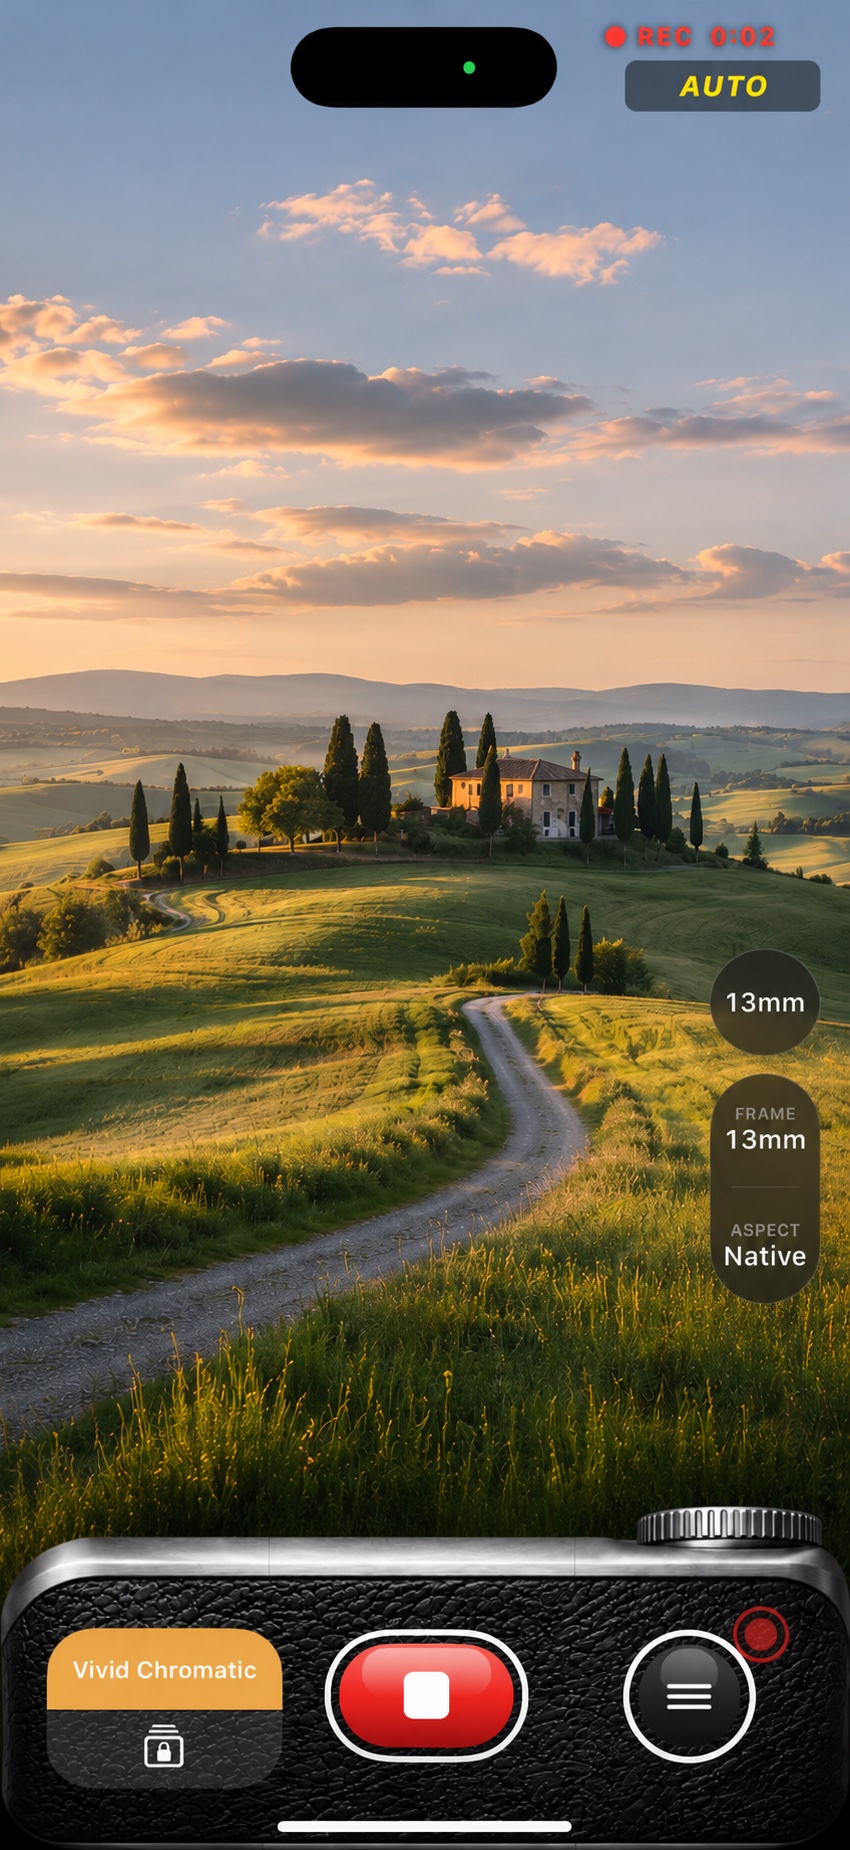
SimCam recording video upright: Tuscan hills at golden hour filling the 9:16 frame, the REC timer at the top and a red stop button on the camera body skin
SHOT 02 · Video · Portrait Video uses the full 9:16 frame, here on the 13 mm lens. The REC timer runs at the top, Vivid Chromatic is graded into the clip as it records, and the shutter becomes a red stop button.
SimCam held sideways: the same mountain lake, with the vertical metering bar and shutter on the grip side of the camera body skin
SHOT 03 · Photo · Landscape Turn the phone and the camera turns with it. The lens, frame and aspect buttons move to the left by the island. On the grip side, the metering bar stands upright: ISO on top, the −2…+2 scale, then the EV reading.
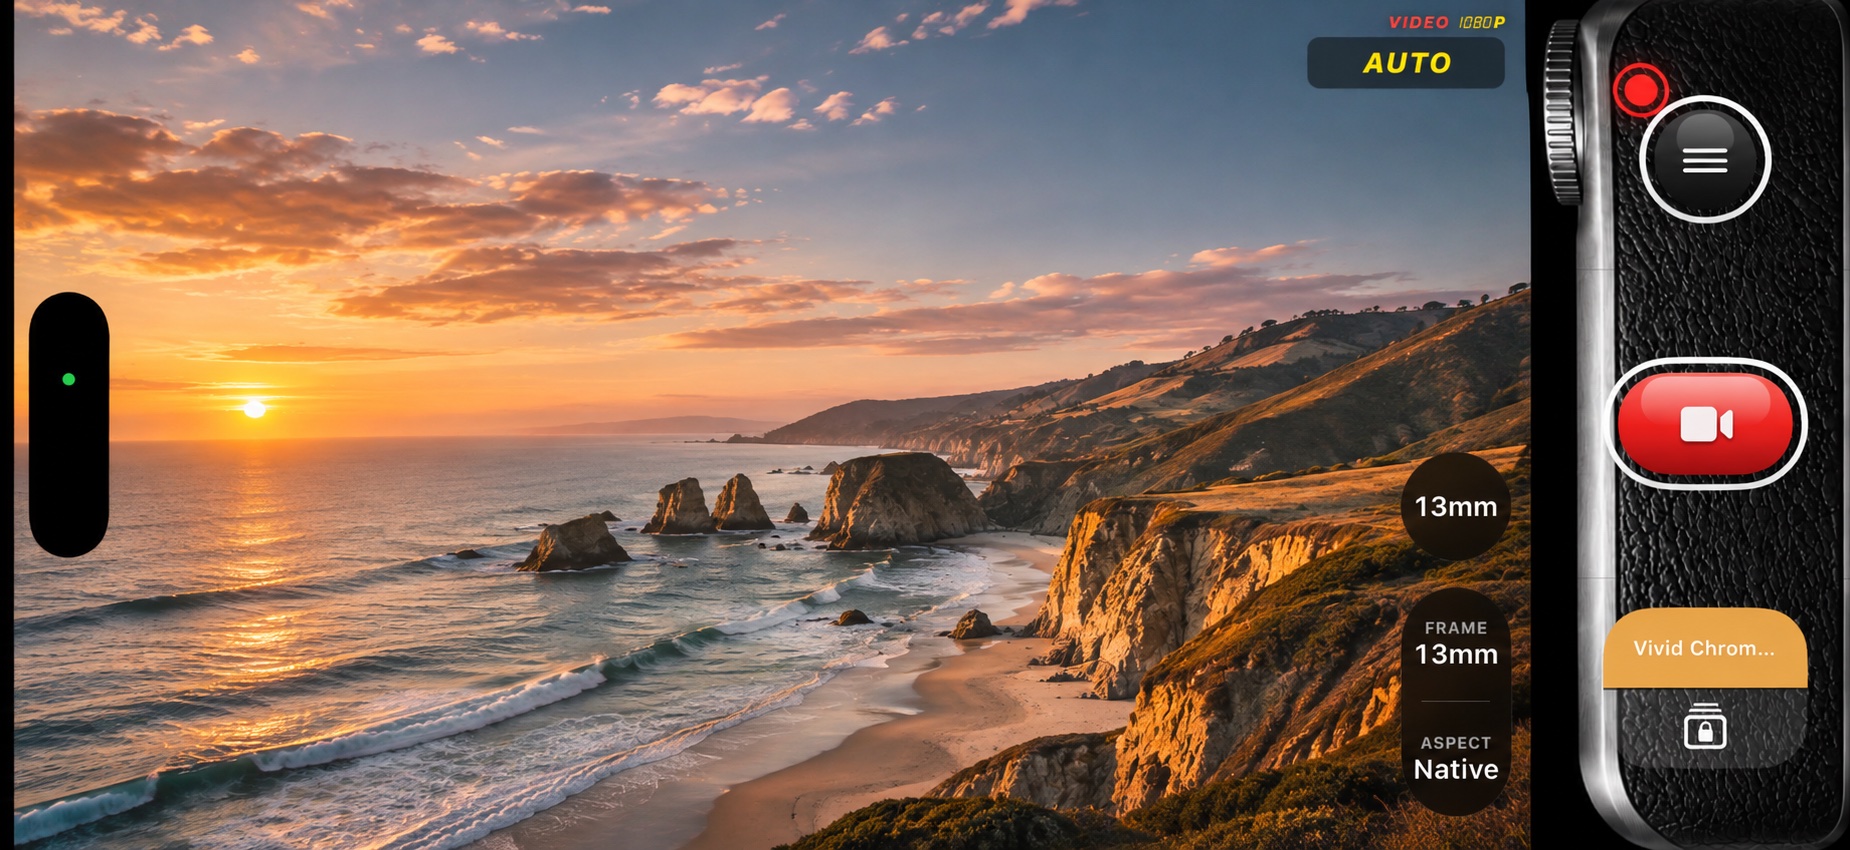
SimCam in video mode held sideways: a coastal sunset filling the 16:9 frame, VIDEO 1080P at the top and a red record button on the grip side
SHOT 04 · Video · Landscape Held sideways, the whole 16:9 frame is the picture: a coastline at sunset on the 13 mm lens, recording 1080p. The record, menu and look buttons line up on the grip side of the body.

Features

A shelf of machines.
Each one handled in full.

01

A raw file, developed like a camera

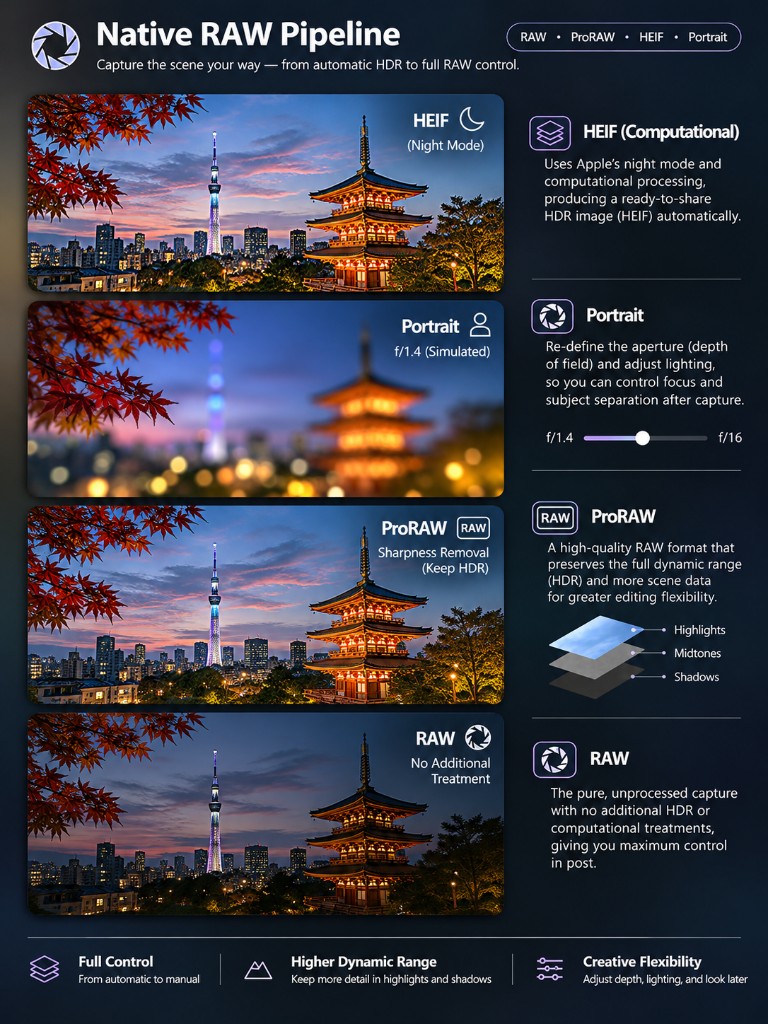
The reward of a digital body is the file it makes, and the pipeline inside its firmware that turns that file into its own colour. SimCam follows that path: a raw capture, developed here, with the look baked in so the finished photo is a close simulation of that camera's way of seeing. The same pipeline can hand you four different files: a finished HDR HEIF, a Portrait you can still reshape, a ProRAW that keeps the scene's range, or a Bayer RAW whose development stays yours. Night is the long craft inside the first of those: frames stacked, noise quieted, exposure and colour kept as you set them.

  • RAW to finished photoSaves HEIF, JPEG or PNG with the look baked in, developed from the raw capture the way a camera finishes its own file.
  • The pipeline is the simulationOn a normal shot the grain and the highlight roll-off are the ones you set, a stand-in for the processing a body does before you ever see the picture. Night starts from computational HDR frames, then stacks and grades them here.
  • Three sizesSave at 12, 24 or 48 MP. 24 MP is the 48 MP capture binned down, so it keeps the detail with less noise and a smaller file.
  • You choose the machineStacking runs when you pick Night or ND on the drive dial. Depth is captured when you pick Portrait. Each one is a mode you commit to, the way you would pick a long exposure or a portrait lens.
  • HEIF, computationalNight finishes a ready-to-share HDR HEIF. Computational HDR frames are stacked and graded with your look, and highlights brighter than a normal print come back on an HDR screen.
  • PortraitA simulated aperture, from ƒ1.4 to ƒ16, with the depth saved in the HEIF. Focus, subject separation and Portrait lighting can still be changed after the shot.
  • ProRAWOn Pro models, a demosaiced linear DNG at the lens's full resolution, saved beside the finished photo. Highlights, midtones and shadows stay in the file, so a later develop still has the range.
  • RAWA Bayer DNG beside the finished photo, on any RAW-capable iPhone, at 12 MP. One frame of the sensor, without a computational HDR pass, so the development is yours.
  • Extended ISOShoot past the sensor's native limit, up to ISO 25,600. The extra stops are pushed during the RAW development, like push-processing film, and the EXIF records the ISO you shot at.
  • Every setting rememberedEach photo carries the aperture, shutter, ISO, focal length and shooting distance, the film simulation and the look's adjustment values, the drive mode and the GPS position. Open a photo in SimCam's library and tap it to read them.
  • Private by designFilm rolls and private shots are stored encrypted on the phone. Nothing leaves until you export it.
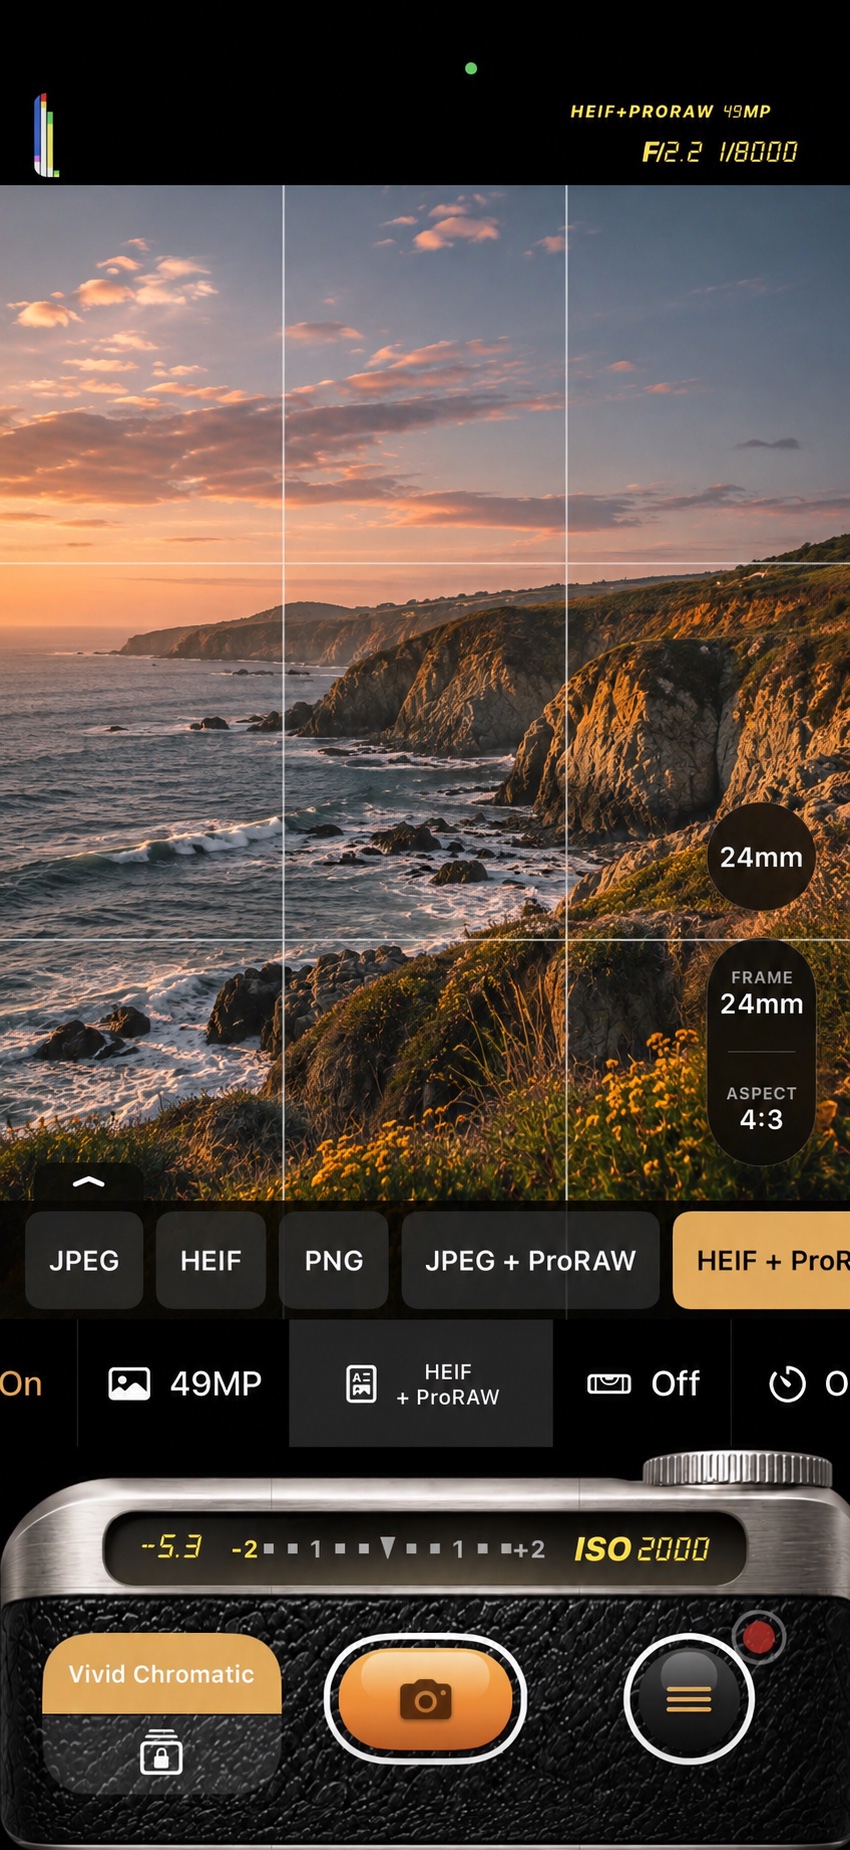
SimCam in portrait with the output choices open: JPEG, HEIF, PNG, JPEG + ProRAW and HEIF + ProRAW, over a coastal sunset with a thirds grid
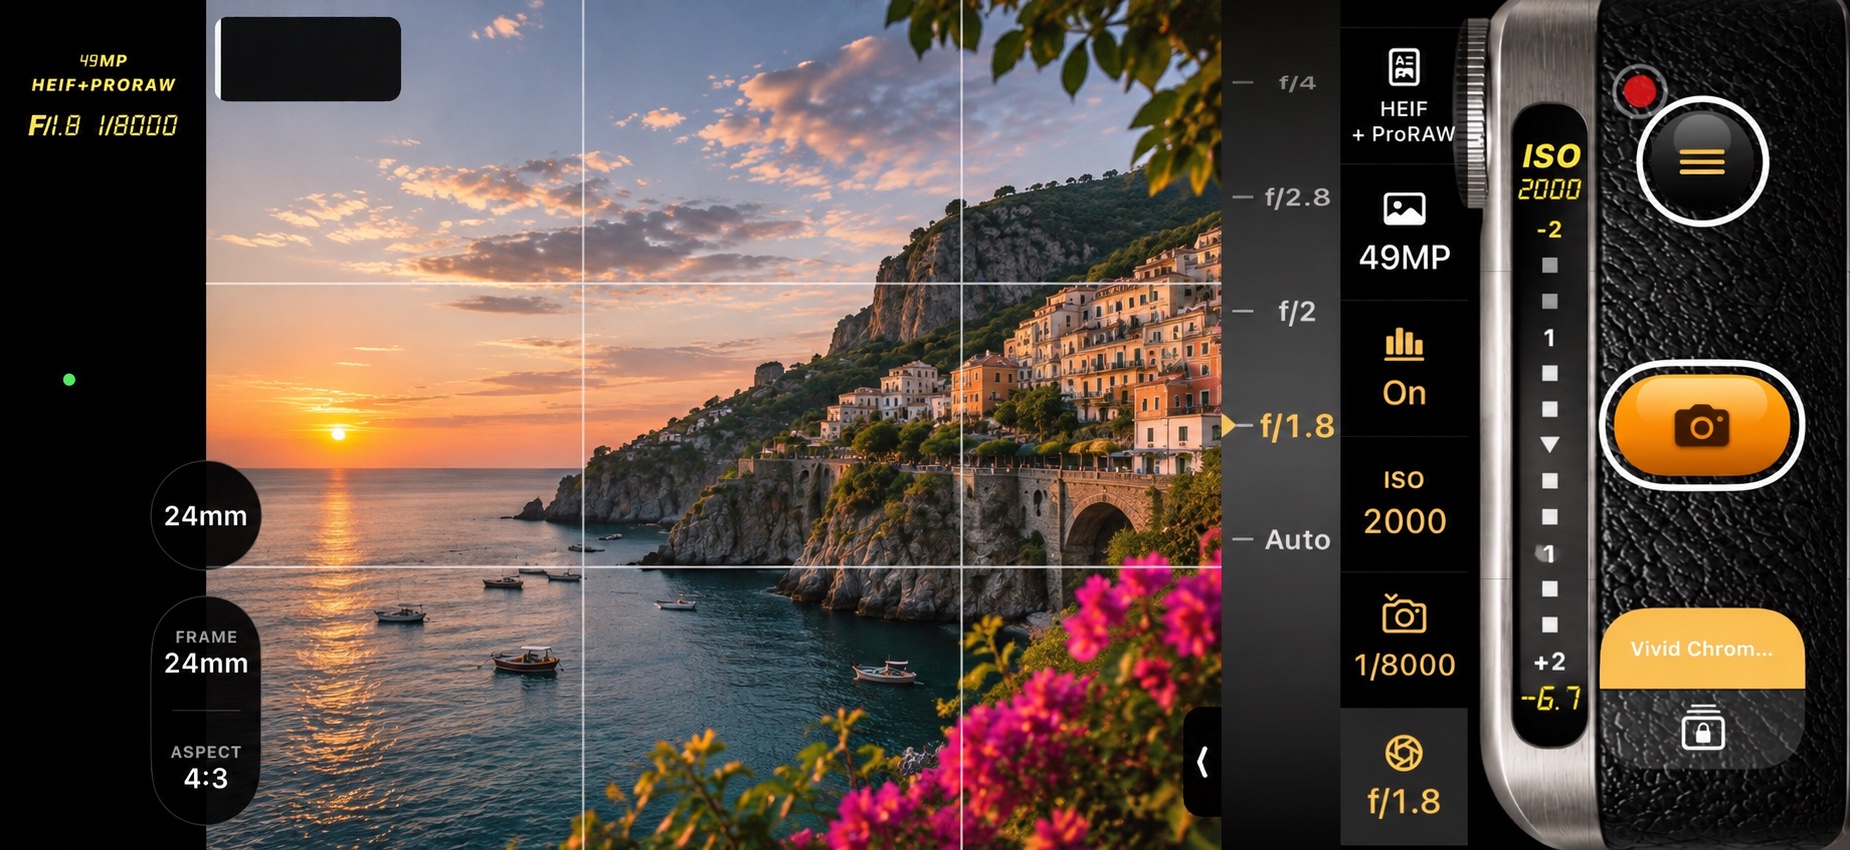
SHOT 05 The output choices are open in the menu strip: JPEG, HEIF or PNG alone, or with a ProRAW DNG. HEIF + ProRAW is selected, and the readout above the picture shows 49MP. The sharp, unprocessed detail in the cliffs and surf is what developing straight from RAW gives you.
Native RAW Pipeline: the same Tokyo night as an HDR HEIF from Night, a Portrait at a simulated f/1.4, a ProRAW that keeps highlight, midtone and shadow range, and a Bayer RAW with no computational treatment
The four files, one scene. Night finishes an HDR HEIF. Portrait keeps a simulated aperture, here ƒ1.4, that you can still change. ProRAW keeps the range of the scene, highlights through shadows. RAW is the sensor frame, ready for you to develop.

02

The exposure triangle, in your fingers

This is the control photographers already know by feel. Leave the dials alone and the camera meters. Set the aperture and you are in aperture priority. Set the shutter and you are in shutter priority. Set both and you are shooting manual. The markings are the ones printed on lenses and shutter dials. Where a phone lens has a single opening, the aperture stop is computed so the picture follows the number you chose. That stop is a simulation of the triangle, close to the habit of shooting, and still a simulation.

  • Third-stop dialsAperture, shutter speed and ISO move on wheels in third stops: ƒ1.4, ƒ1.6, ƒ1.8, ƒ2… and 1/125, 1/160, 1/200… The same steps a working photographer expects under the finger.
  • Metering barA digital camera's LED meter, from −2 to +2 EV with ISO and EV readouts. In landscape it stands upright in the body's window. Choose whether it's always on or only appears while you adjust.
  • Live histogramSits right above the picture, so you can read highlights and shadows before you press the shutter.
  • ISO 25 to 25,600One continuous wheel, with the extended range pushed in development.
  • AE/AF lock badgesTap to lock, and see at a glance what's pinned and what's automatic.
SimCam in landscape with the aperture wheel open at f/1.8 beside the settings column, and the vertical meter on the camera body
SHOT 06 The aperture wheel is open and set to ƒ/1.8, with the shutter at 1/8000 s and ISO 2000, all read out in the left band. The vertical meter shows ISO 2000 and −6.7 EV.

03

Lenses, the way a rangefinder shows them

Choosing a lens is part of handling the camera. You pick it by focal length, the way a set of primes is named. The viewfinder can show more than the lens takes in, with bright frame lines marking the picture, so you see what is about to walk into the frame. The lines are a simulation of a rangefinder's finder: the seeing, before the shutter.

  • Seven focal lengths13, 24, 28, 35, 45, 85 and 120 mm, the classic primes photographers use. The 28, 35, 45 and 85 mm steps are clean digital crops.
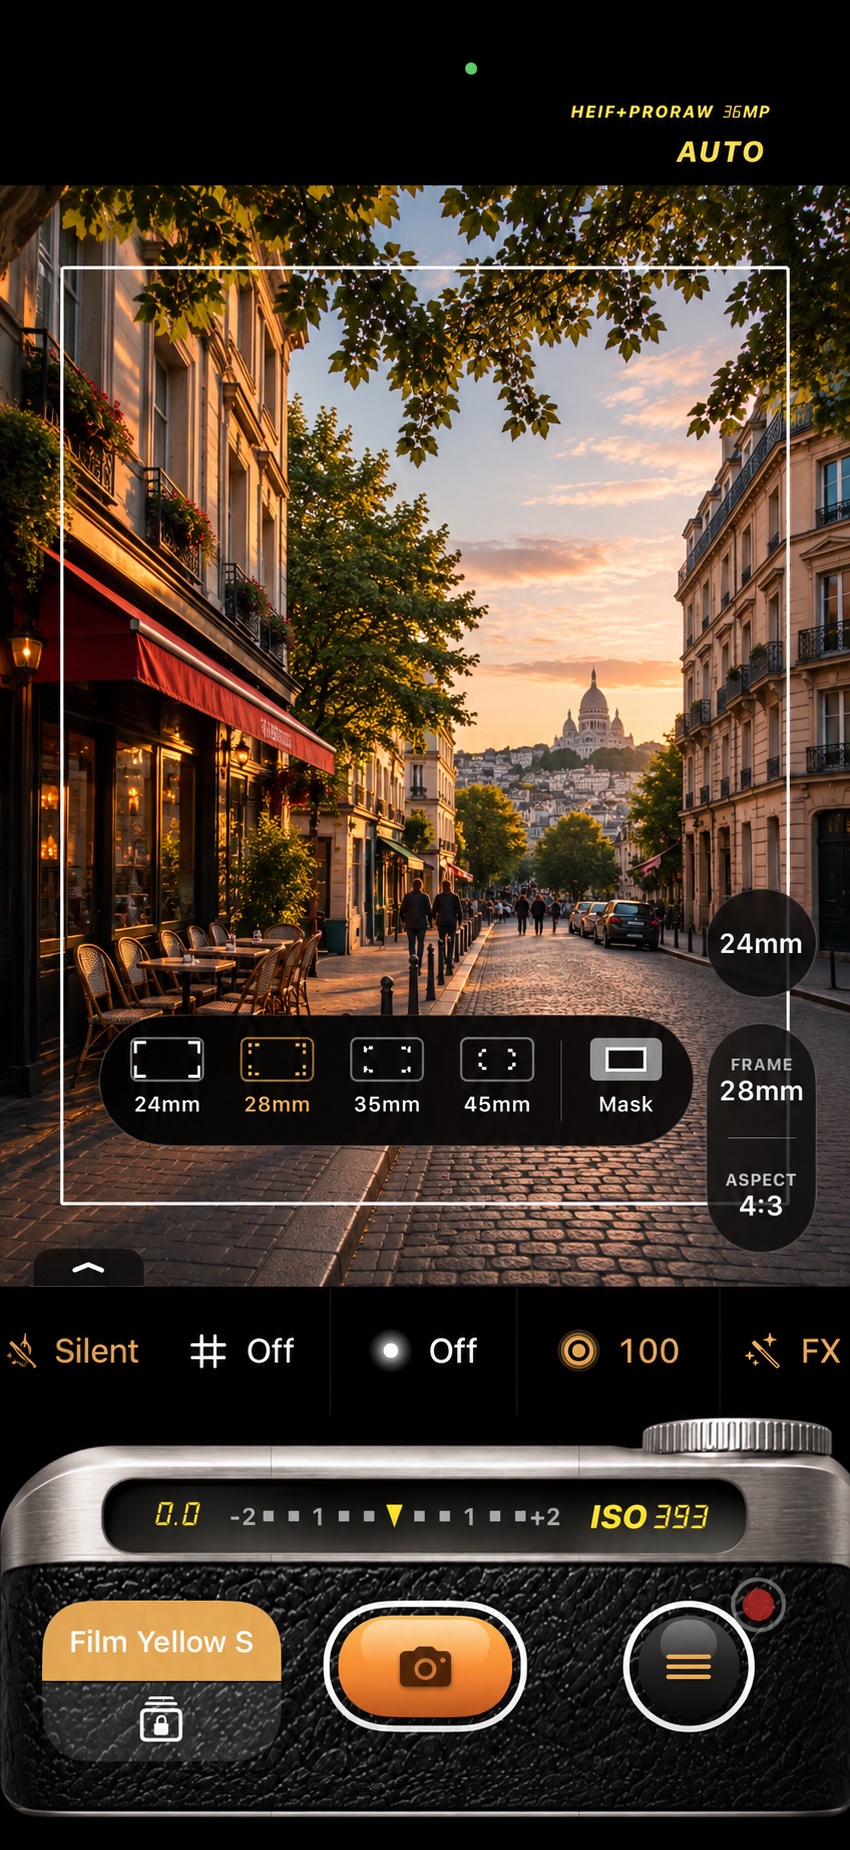
  • Frame linesShows the frame lines for the current lens and the next three longer ones. On 24 mm you can see the 28, 35 and 45 mm frames together.
  • Aspect ratiosNative, 1:1, 4:3, 3:2 and 16:9. Long-press and drag to switch without looking away.
  • Outside the frameDarken or hide what falls outside the frame lines, as a real viewfinder does.
SimCam in portrait on a Paris street at golden hour: the 28 mm frame line drawn on the 24 mm picture, with the frame choices 24, 28, 35 and 45 mm plus Mask open
SHOT 07 The lens is the native 24 mm, and the white frame line marks what a 28 mm lens would take. You can still see the street beyond it. The Frame button is open, showing 24, 28, 35 and 45 mm, the current lens plus the next three, with Mask beside them to darken what falls outside the frame.

04

Colour, the way a camera finishes it

A look here is a piece of the machine. Camera colour profiles follow, as closely as a simulation can, the raw pipeline inside a digital camera's firmware: that body's way of turning a file into its own picture. Film stocks sit beside them, the colour a roll would have given you. You preview it live, and the same LUT is baked into the full-resolution photo. The same pass carries the special effects a lens and a body would add: diffusion, a vignette, deeper saturated colour, and a highlight roll-off. The colour is part of the handling, and it remains a simulation of the camera that taught it.

  • A full shelfCamera colour profiles, 40+ colour film stocks, 10 black-and-white stocks, plus Cinematic and Neo-Tokyo. More than 140 LUTs, each a simulation of a way of seeing.
  • Fine adjustmentSet the look's strength with an opacity slider, so you can go subtle or all the way.
  • Film curvesFilm Standard, Film Contrast+, Film Shadow+ or Linear Response, to shape the tone the way different film stocks do.
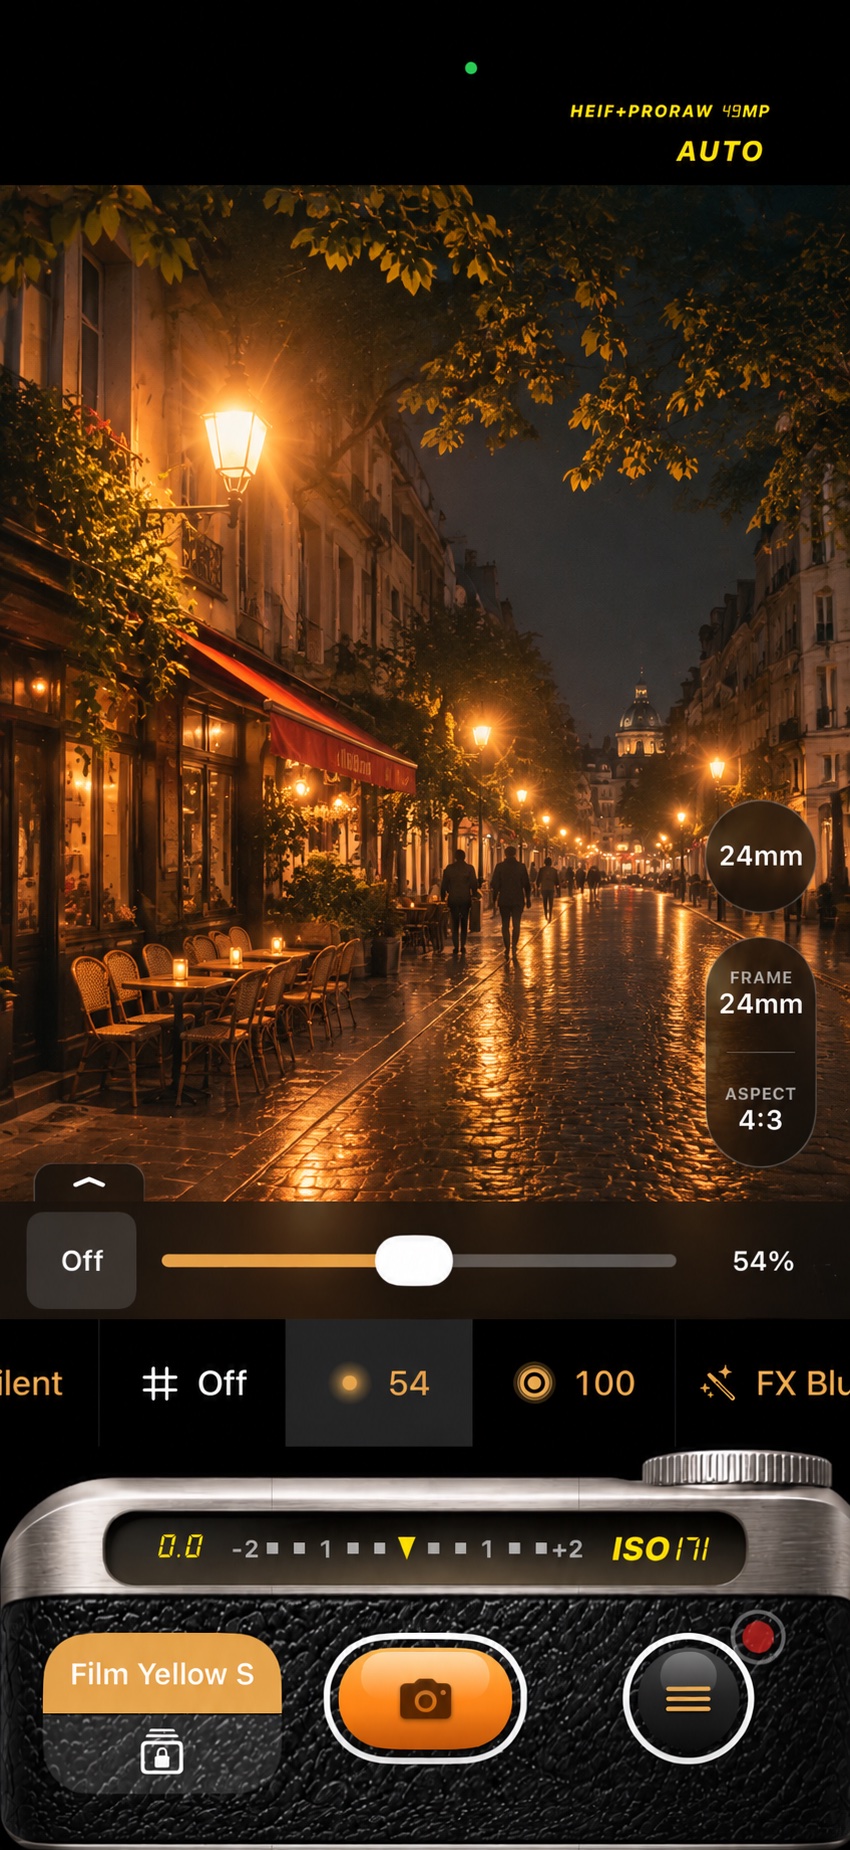
  • HalationThe red-orange glow film gets around bright highlights, when light reflects back through the film base.
  • BloomA soft glow around every bright area, like old glass and diffusion filters.
  • GrainFine, medium or coarse, scaled to the picture, so it looks the same on screen and in a 48 MP file.
  • DiffusionA filter simulated in front of the lens. The frame softens, contrast eases, and the brightest tones glow, from a light touch up to a strong filter. The picture's own sharpness stays underneath.
  • Lens vignettingCorners darken the way a wide-open lens falls off, round about the centre. All the way up is about two stops at the corners, and the middle stays as it is. A camera profile can lock its own vignette for the whole roll.
  • Color ChromeOn the Special effects control, at Off, Weak or Strong. Saturated reds, yellows and greens go deeper, so a bright colour keeps its steps of tone. Pale and dark colours stay as they are.
  • FX BlueThe same deepening for blues, skies and water. Off, Weak or Strong, and it can be on together with Color Chrome.
  • Light TrailSmears the lights the halation finds, along any angle: centred on each light, or one way and fading off. The strength you see in the live view is the strength that is saved, on any look.
  • Tilt-ShiftMiniature focus on any photo: a sharp horizontal or vertical strip, or a circle, with the rest blurred more the farther it is from the sharp zone.
  • HalftoneNewspaper-print dots in mono, CMYK or RGB, with the dot size, rotation and randomness your own.
  • BitmapRetro 8-bit pixels: a mosaic you size yourself, in 256, 16, 7, 4 or 2 colours taken from the photo, a classic palette, or your own.
  • Highlight roll-offBright tones ease into white. On a RAW photo the roll-off uses the file's headroom. In the live view, and when there is no RAW, a gentle shoulder keeps the near-white detail apart.
SimCam in portrait on a rainy Paris street at night, with halation and bloom glowing around the street lamps and the Bloom slider open at 54%
SHOT 08 A rainy street at night with halation and bloom turned on: the street lamps glow and bleed into the dark, and the light spills over the wet cobbles. The Bloom slider is open at 54%, with Halation at 100 beside it and the Film Yellow S look under the shutter.

05

LUT Colour Lab: read the machine, then tune it

Before you shoot a look, you can study it the way a technician studies a camera's colour: what it does to tone, hue and saturation, and how close a set of controls comes to rebuilding it. Then you make it yours. Your looks work everywhere a built-in look does: in the camera, on a roll of film, and exported as a .cube file. The lab is where the simulation becomes something you understand.

  • Adjust or RebuildAdjust keeps the LUT and adds your changes on top. Rebuild throws the LUT away and recreates the look from sliders fitted to it.
  • Full colour toolkitExposure, contrast, tone and RGB curves, saturation, white balance, split toning and 8-band HSL.
  • Analysis chartsSee what a look does to tone, hue and saturation before you change it.
  • Import & exportSave your look to the library, and export it as a .cube to use in other apps.
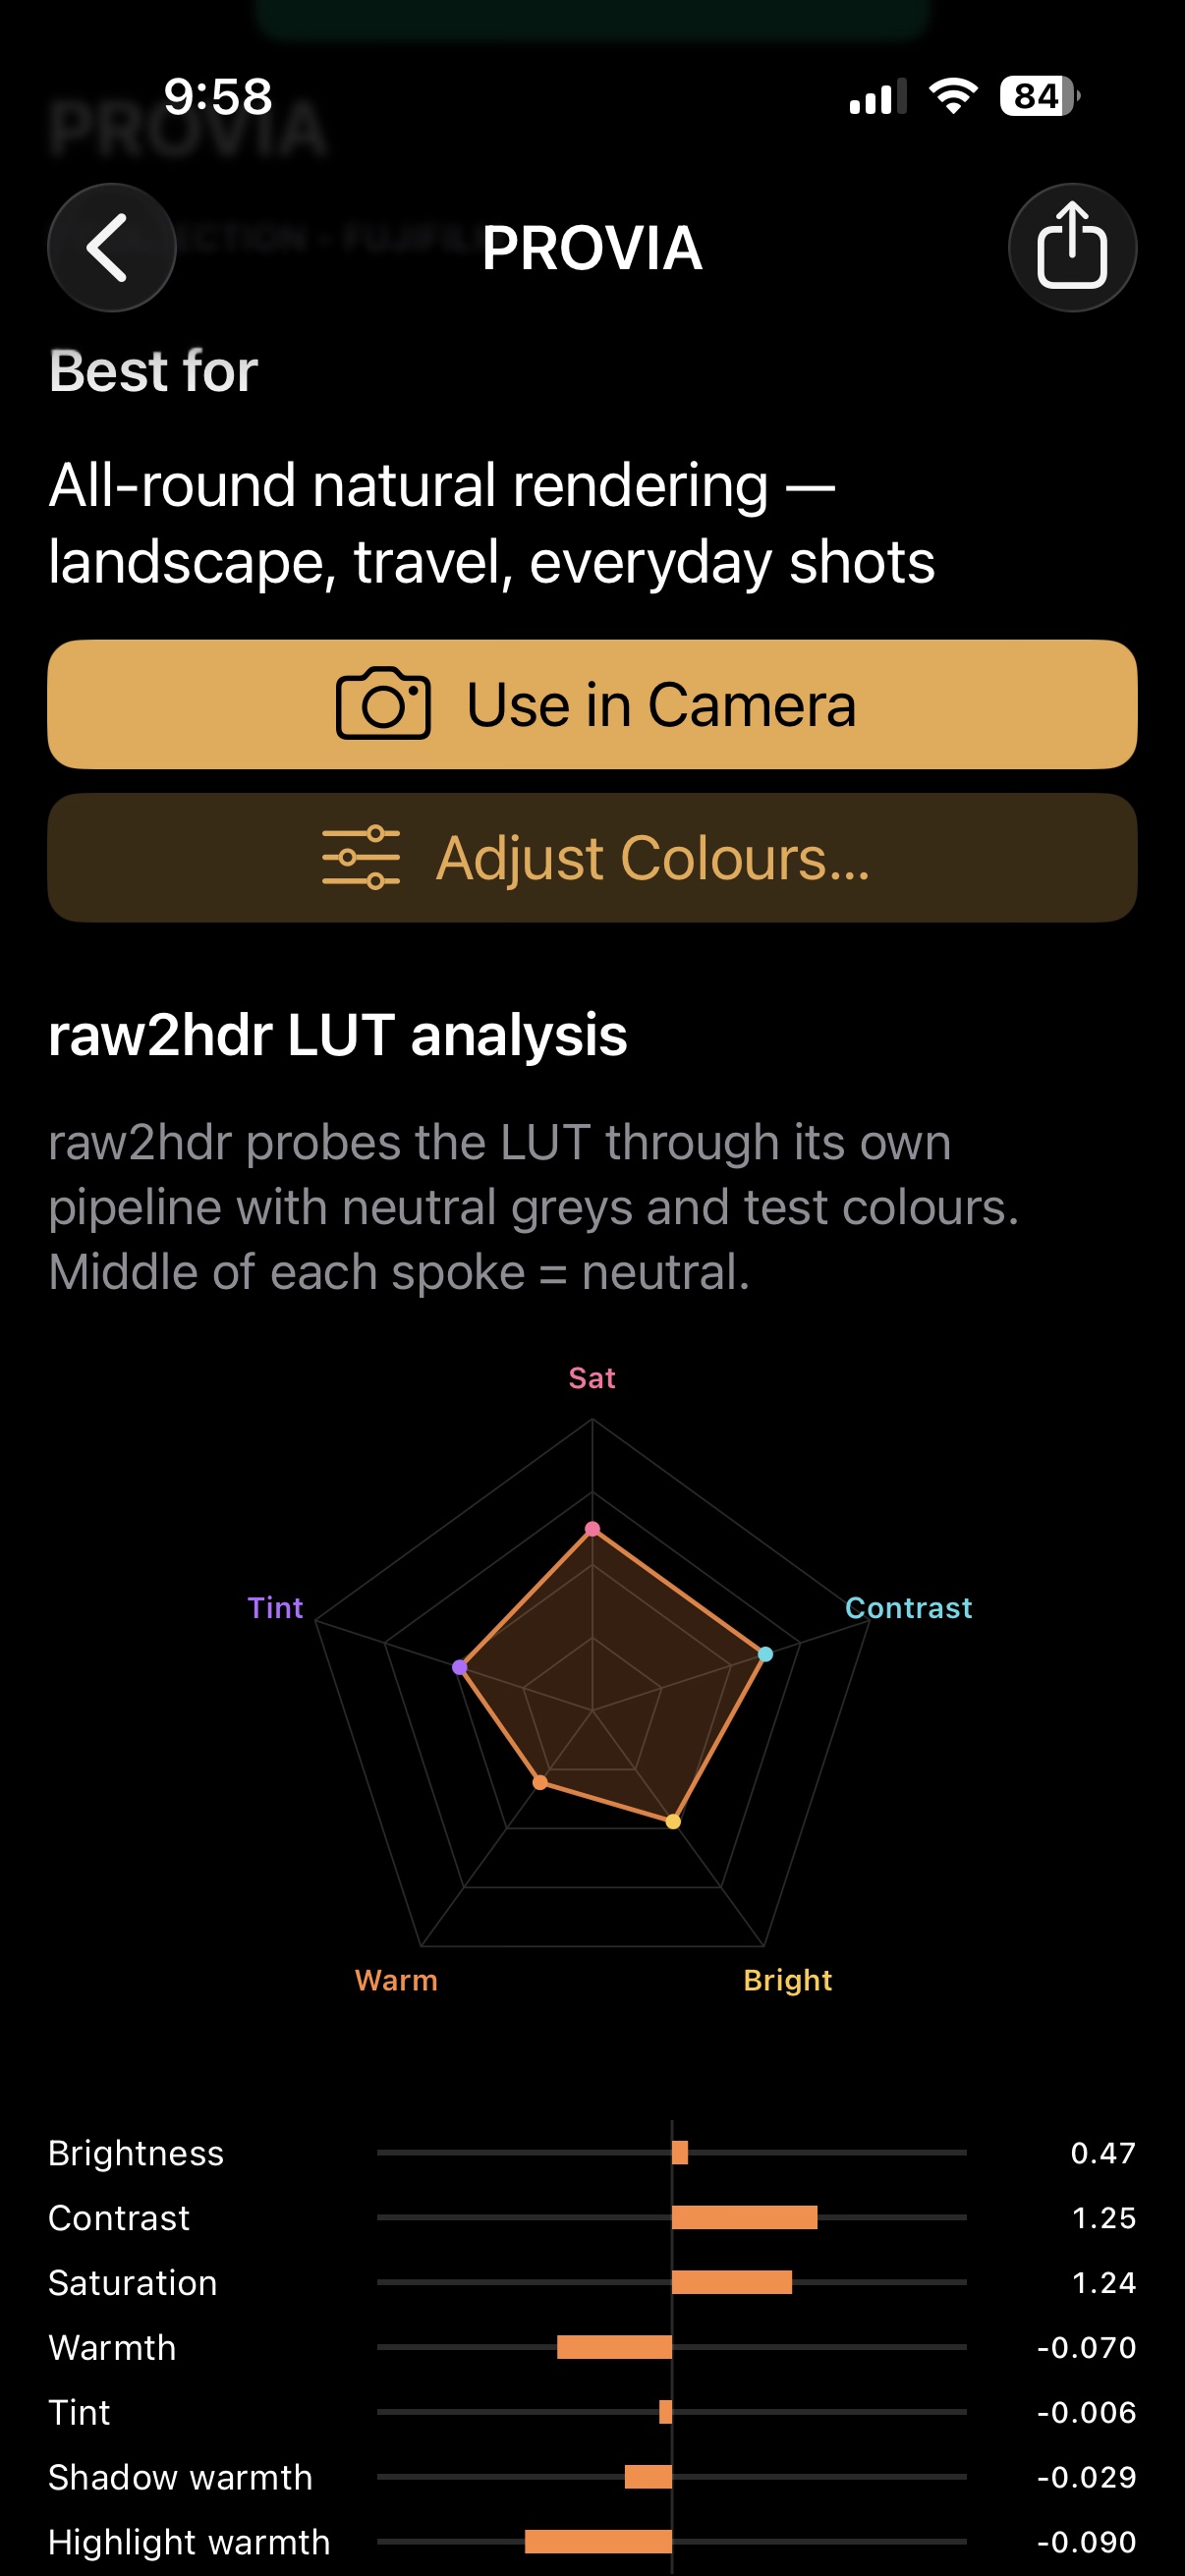
LUT Colour Lab page for the Provia look: Best for, Use in Camera and Adjust Colours buttons, a five-point radar chart of saturation, contrast, brightness, warmth and tint, and bars with the measured values
SHOT 09 A look opened in LUT Colour Lab, here Provia. It says what the look is best for, and a radar chart and bars show what it does to saturation, contrast, brightness, warmth and tint, so you can see it before you shoot. Use in Camera puts it in the viewfinder, and Adjust Colours opens it for your own changes.

06

Analog: load the film onto the camera

Film is a simulation of commitment. Analog mode opens a shelf of vintage film cameras, and choosing one is a simulation of that camera: the frame it shoots, the lens it keeps, and the character of the picture. The body has a strength of its own: a vignette that belongs to its lens, a glow around the lights, a focal length it will not leave. You load a stock in the format that body shoots. Full-frame 135 keeps one picture on the frame. Half frame places two in the same frame. A format is a crop, so more film sizes can follow that rule. The length and the stock stay put until the roll is finished. The date stamp, the contact sheet and the frames underneath are the darkroom end of the same game. Close to loading a real canister. Still a simulation.

  • A camera, then a canisterPick an analog body and read what it does, then load the format that body shoots, full-frame 135 or half frame, a 24- or 36-exposure roll, and one film simulation onto it.
  • Each body has a strengthOne camera vignettes hard. Another blooms around lights. Another is simply a fast wide lens for the dark. The profile keeps that character for the whole roll.
  • Locked to the rollThe stock, its strength and the camera stay put until the roll is finished, the way a cassette does once the back is closed.
  • The frame, the stamp, the sheetFull-frame 135 is one 3:2 picture on the frame. Half frame is two pictures in that same frame. Further formats can join by their crop. A date stamp prints in the corner like a data back. A finished roll becomes a contact sheet you can save or share. Export Web Page puts that sheet, the photos and a full HTML page in a zip. Send the zip to a computer, unzip it, and the page opens in a normal browser. The sheet follows the format you loaded.
  • Develop laterFinished rolls stay in SimCam's private library, marked finished, ready to look through like a set of prints.
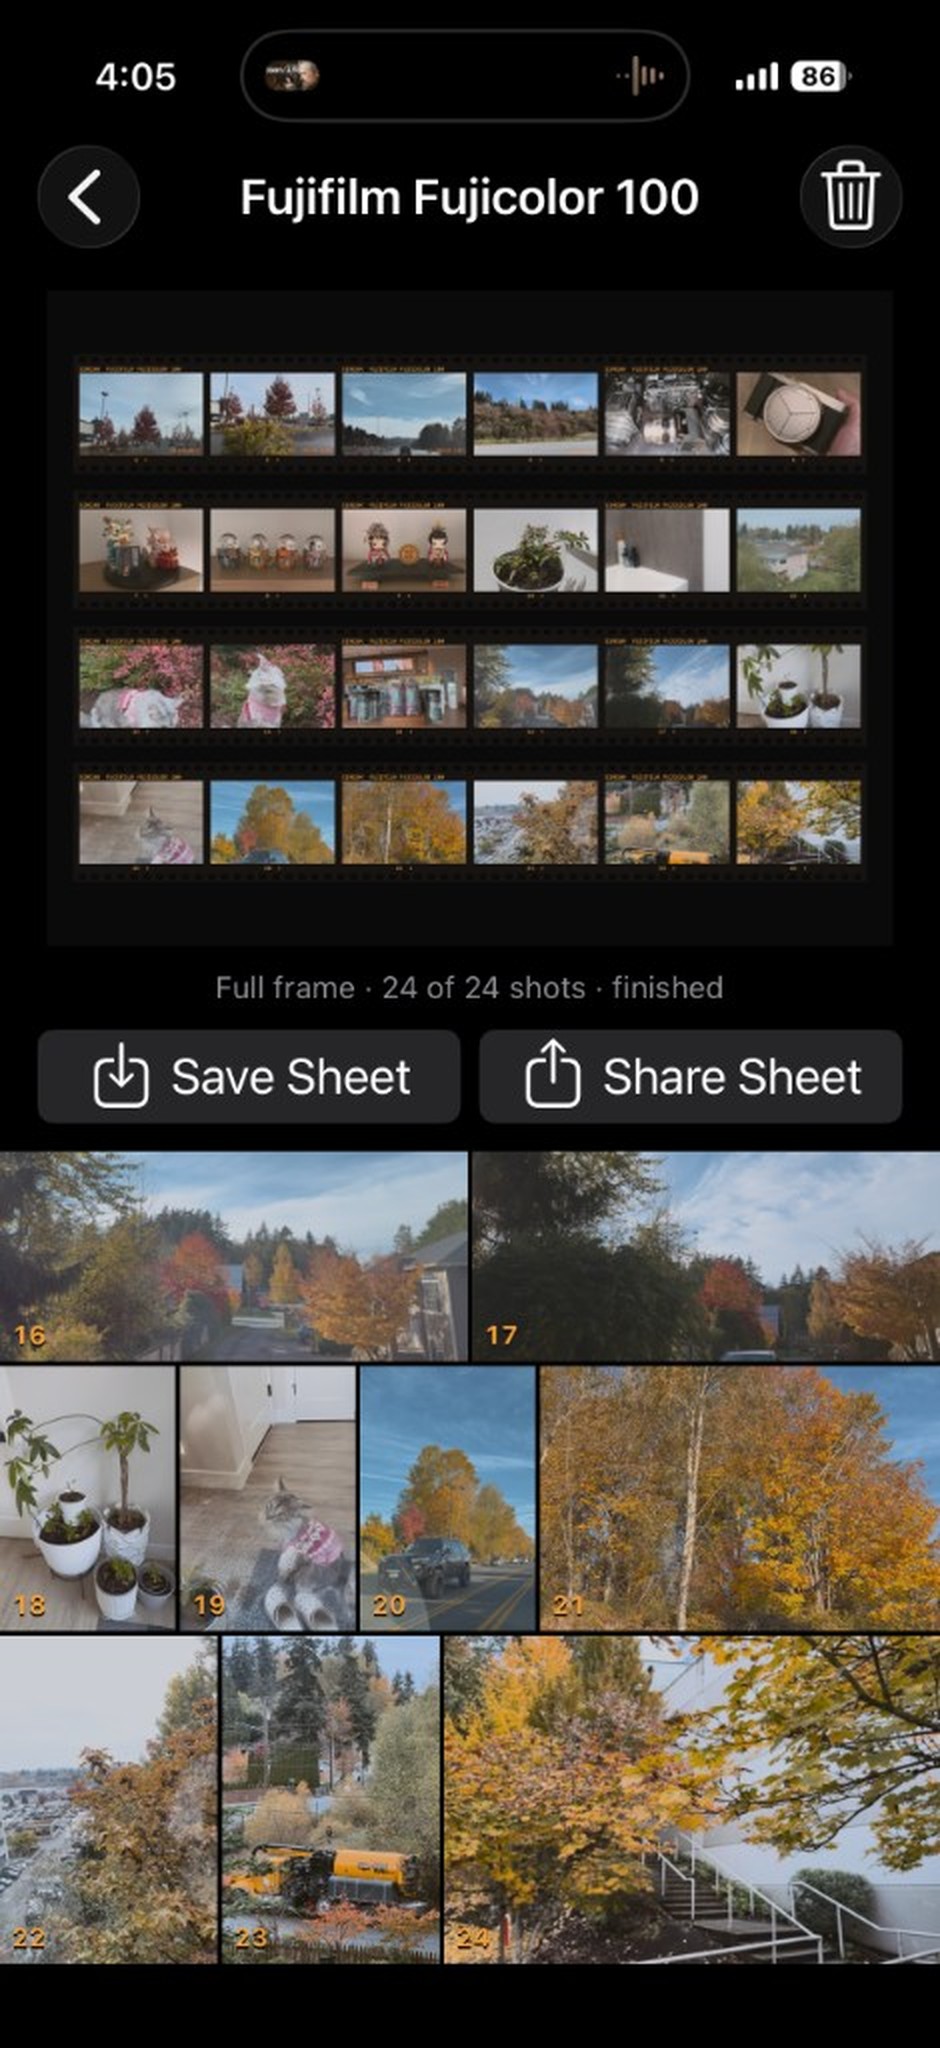
A finished roll of Fujifilm Fujicolor 100: a film-strip contact sheet of all 24 frames, the note Full frame · 24 of 24 shots · finished, Save Sheet and Share Sheet buttons, and frames 16 to 24 below
SHOT 10 A finished roll: full frame, all 24 exposures of Fujifilm Fujicolor 100. The film strip across the top is the contact sheet, and the library reads "Full frame · 24 of 24 shots · finished". Save Sheet and Share Sheet export it, and frames 16 through 24 sit below.
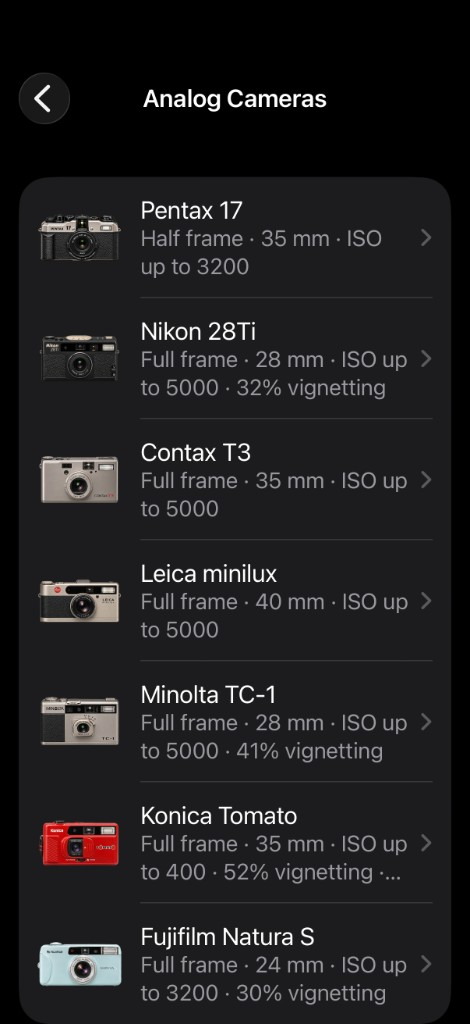
Analog Cameras list: Pentax 17 half frame, then Nikon 28Ti, Contax T3, Leica minilux, Minolta TC-1, Konica Tomato and Fujifilm Natura S, each with focal length, ISO and vignetting
SHOT 11 Analog mode, choosing the camera. The list is a shelf of vintage film cameras, and each row is a simulation of that body. Pentax 17 shoots half frame at 35 mm. The rest are full-frame 135: Nikon 28Ti, Contax T3, Leica minilux, Minolta TC-1, Konica Tomato and Fujifilm Natura S, with the focal length, the ISO the profile allows, and, where the lens has it, the vignette it keeps for the roll.

07

The drive dial is a set of jobs

A camera's drive dial is how you tell it what kind of picture this is. Portrait simulates depth. Night stacks a dark scene, and can keep the moving lights as trails. A slow shutter with the flash waiting at the end is the old slow-sync trick, subject sharp, city still drawing behind it. ND stretches time in daylight. Time-lapse plays the hours back as a clip. Each one is a way of handling the exposure, simulated end to end.

  • Single & BurstOne frame, or a rapid run of 12 MP shots. Pick the keepers from a filmstrip and discard the rest.
  • PortraitSimulated depth of field on the main lens, with a live blur you set on the aperture dial. See Portrait below.
  • NightFor low light. Under 1 s it's one photo. From 1 s, frames are stacked: Average for a still picture, Trails when the moving lights should stay. In the hand the shutter runs to 7 s; on a tripod, to 30 s. See Night below.
  • Slow-sync flashSet the flash to On in Night and it works like a traditional camera's slow sync: a long exposure for the ambient light, with the flash firing at the end, as rear-curtain sync does. The subject is frozen sharp by the flash, while the lights behind it keep their trails.
  • Digital NDSlows the shutter in daylight, from 0.5 to 30 s. Frames are aligned and averaged for silky water and blurred crowds in the middle of the day, without the ghosting from hand shake.
  • Handheld or tripodThe phone senses whether it's in your hands or resting on a tripod, and you can set it by hand too. With image stabilisation (IBIS) handheld, the time dial stops at a length you can hold steady. On a tripod it extends all the way to 30 s.
  • Time-lapseOne frame every 1 to 30 s, played back as a 30 fps video with the look applied.
  • VideoAlso on the dial: the same as tapping the video button.
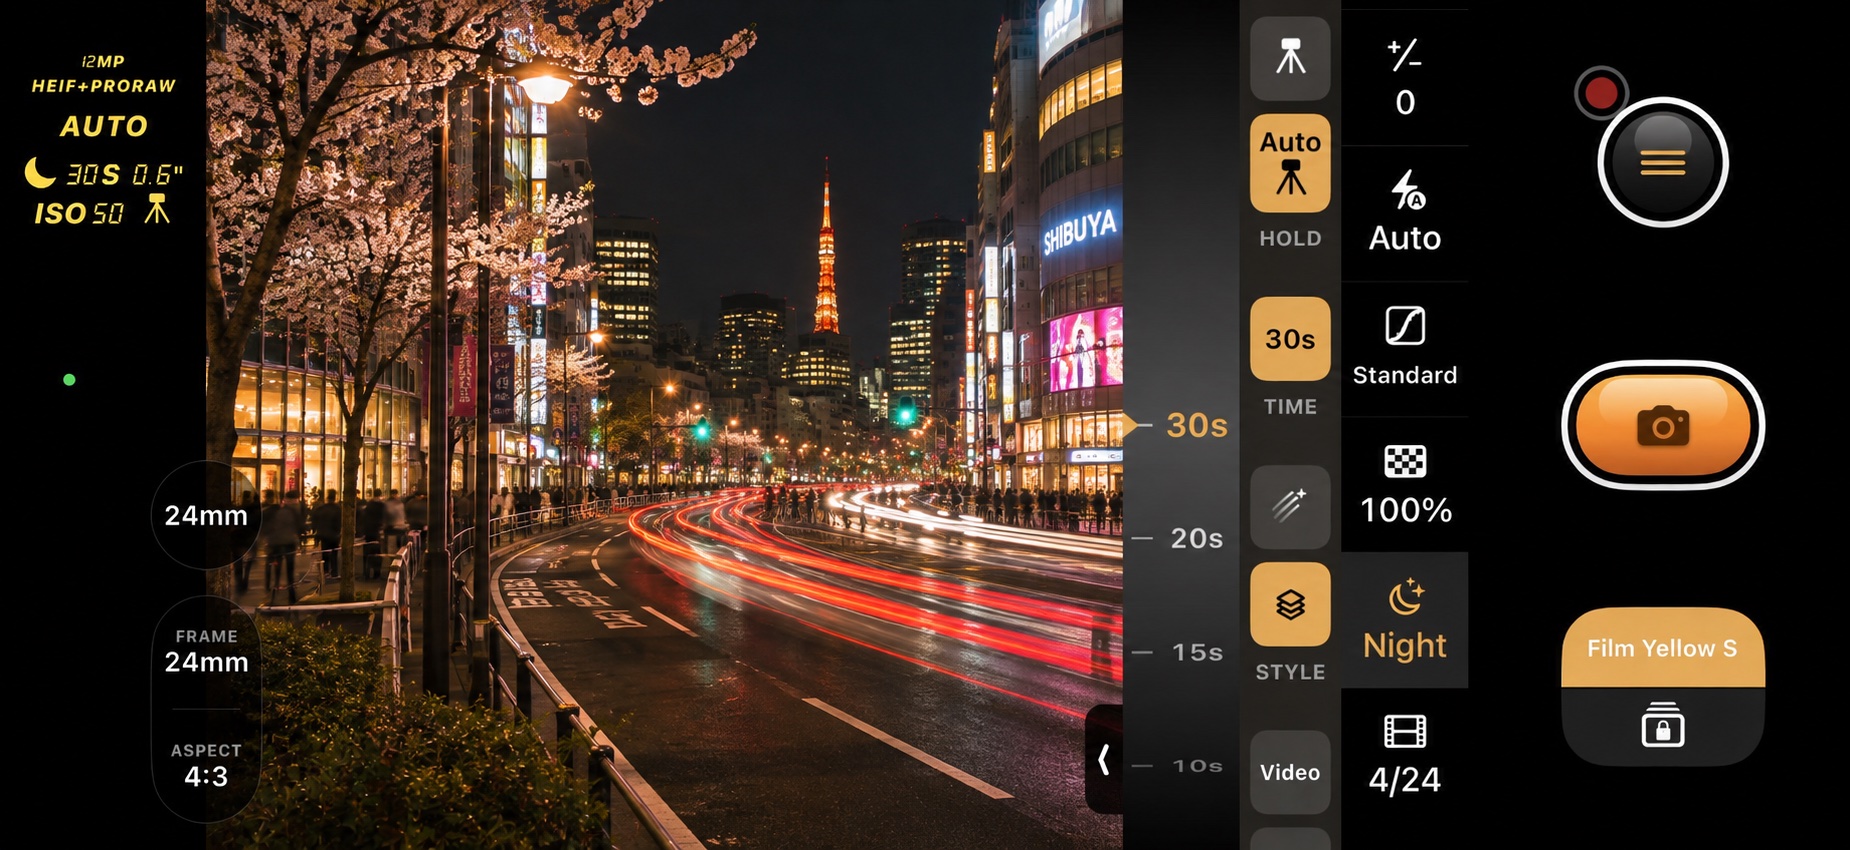
SimCam in landscape on a tripod at night in Night mode, with the time wheel set to 30 seconds, red light trails on a Tokyo street, and Hold set to Auto with a tripod icon
SHOT 12 Night's Trails style on a tripod: moving lights pile up into streaks while the street stays put. A tripod lets the shutter run to 30 s. In the hand, Night stops at 7 s. The phone has sensed the stand, so the tripod icon shows in Hold.

08

Night: stack it, trail it, or sync the flash

A great night picture is a handling, and this is a simulation of that handling. When the meter wants a second or longer, frames are aligned and blended in the look you chose: Average when you want the noise to fall away and the scene to sit still, Trails when a landscape or a city should draw with light. Flash set to On waits for the end of that long shutter, the way slow sync does, so the subject is caught sharp and the lights behind it keep moving. Brighter than a second, the badge reads OFF and you simply take the photo.

  • It only steps in when neededThe badge above the picture reads the live meter: the total time, the shutter and ISO of each frame, and a hand or a tripod. Under 1 s it shows OFF and the shutter takes a single photo.
  • Two stops up, then a longer shutterA dark scene is lifted two stops over normal metering. Auto holds ISO at 1,000 and lengthens the shutter instead, up to 7 s in the hand or 30 s on a tripod, and only then raises the ISO, up to 25,600. The finished photo is as bright as one shot at that shutter and ISO.
  • The dials still workPin an ISO and the shutter is metered for it. Pin a shutter and Night builds that time, held to 7 s while you hold the phone and 30 s once it's steady.
  • AverageFrames are aligned and averaged into one still moment. The noise falls and anything that moves is smoothed away.
  • TrailsThe same stack, with the brightest moving lights laid back on top, so headlights, stars and fireworks draw streaks.
  • STD · 12 MPThe usual quality. Each frame is a 12 MP HEIF Apple has already processed, with its HDR gain map. SimCam aligns and averages them, runs your LUT, and saves an HDR HEIF, so highlights brighter than SDR white come back on an HDR screen.
  • Hi ResThe same stack at the lens's full photo size, 48 MP where the lens has it. Fewer frames fit in the same time, so there is more detail and a little more noise. Night uses the real lenses only: the 28, 35, 45 and 85 mm crops are set aside, and Hi Res is offered only on a lens with a photo above 12 MP.
  • HEIF, sized by NightResolution and file format are set aside. STD saves 12 MP. Hi Res saves the lens's own large photo.
  • Slow-sync flashFlash On keeps the long exposure and fires at the end, like rear-curtain sync. That shot is built from a continuous run of frames, so the light can land on time.
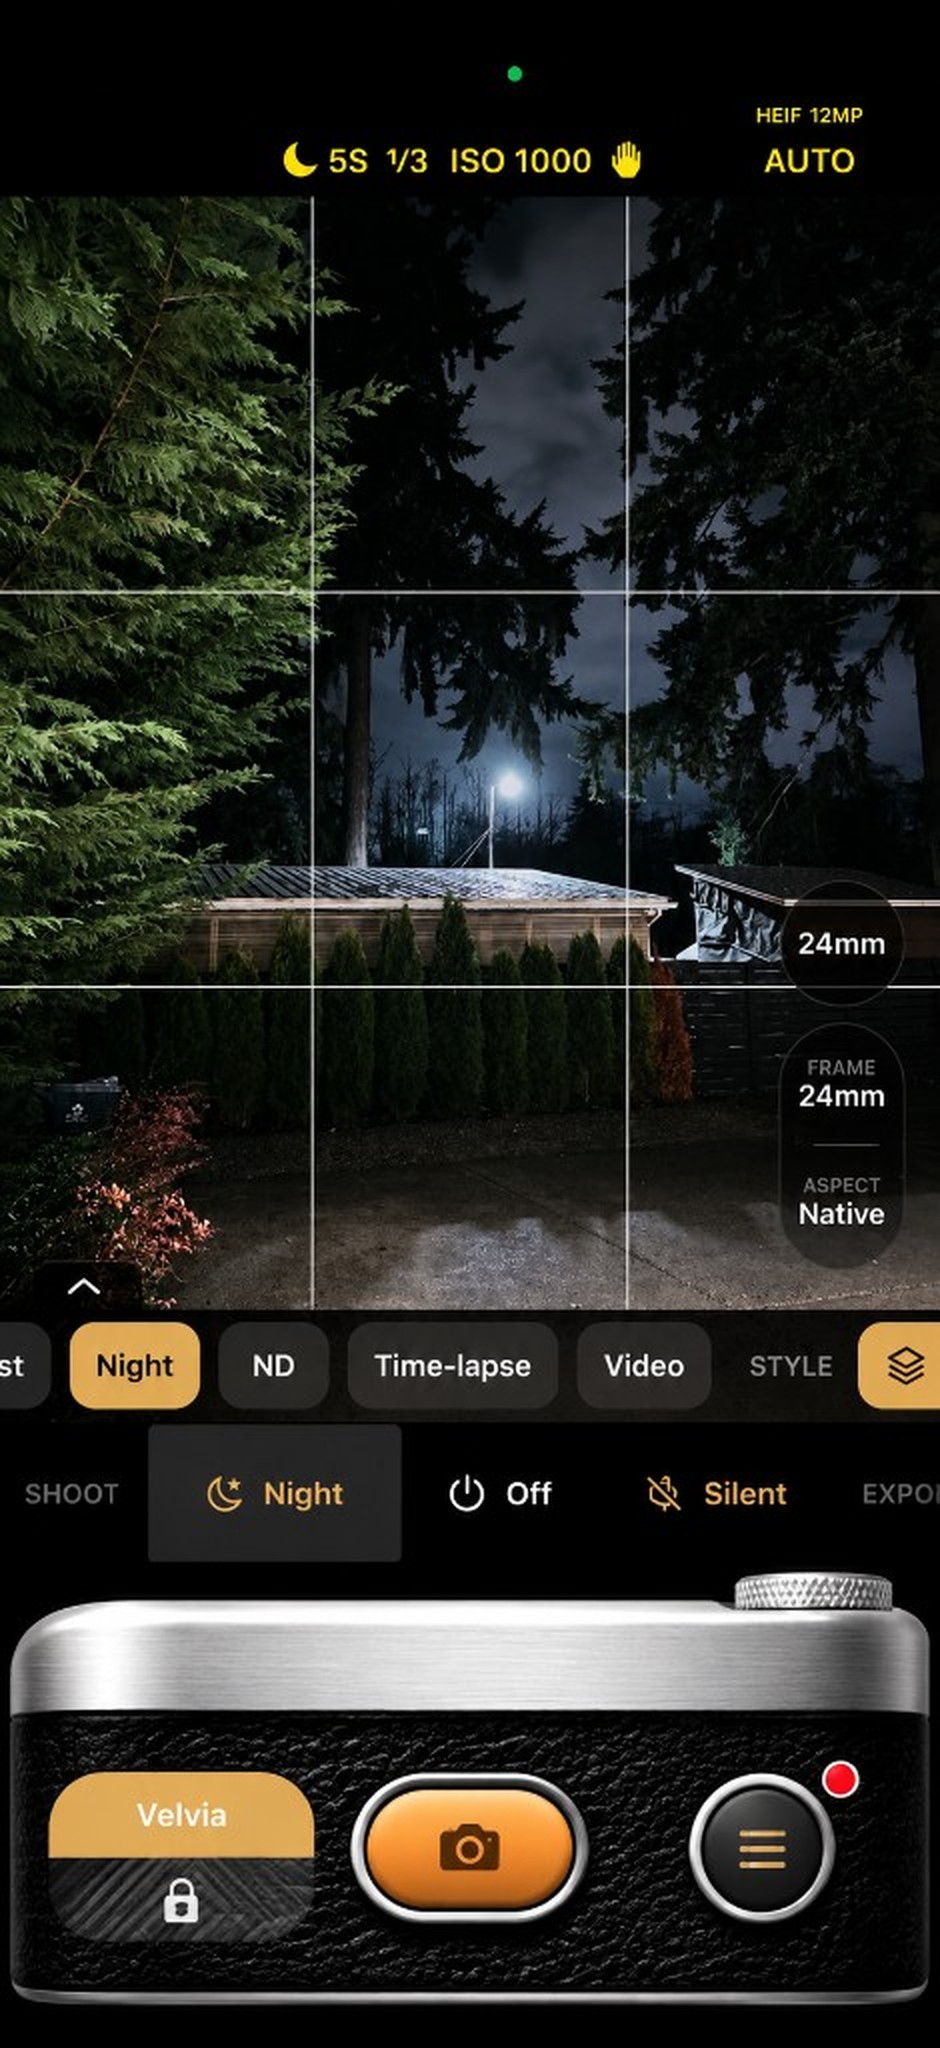
SimCam in Night mode on a driveway under tall evergreens: the badge reads 5S, 1/3, ISO 1000, held in the hand, with HEIF 12MP, the 24 mm lens, and Velvia under the shutter
SHOT 13 A driveway at night under tall evergreens, on the 24 mm lens. The badge reads 5S, 1/3, ISO 1000, and a hand: Night will build that exposure. The file is HEIF 12MP, Night is the drive mode, and Velvia sits under the shutter.

09

Portrait: depth as a dial you can turn

Depth of field is one of the feelings of a lens, and here it is simulated. Portrait reads how far everything is, then blurs the background as you turn the aperture dial, the way choosing a wider stop on a short telephoto would. The depth stays in the photo, so you can refocus and change the blur afterwards in Apple's Photos app. A simulation of the choice, kept close enough that the dial still means something.

  • A live blur on the aperture dialTurn the dial from ƒ1.4 to ƒ16 and watch the background soften or sharpen in the viewfinder. It applies in Portrait only. Every other mode is untouched.
  • Tap to focusTap the subject and the blur is measured from there, so what's at that distance stays sharp.
  • Edit it in PhotosThe photo saves its depth map and mattes. Open it in Apple Photos and Edit offers the aperture slider, refocus and Portrait lighting.
  • Like a 35 mm lensThe simulated blur follows a 35 mm lens: a wider aperture, a longer focal length or a closer subject all blur more. Very close up, the effect fades out, as it does on Apple's own camera.
  • Every lens that has depthShoot Portrait on the 24 mm wide lens or step to the telephoto, the way Apple's camera offers 1×, 2× and 5×. Each keeps its own depth, so Photos can still edit it.
  • Night mode in PortraitLeave the shutter and ISO on automatic and iOS applies its low-light processing to the portrait. Turning the aperture dial only sets the blur, so it never gets in the way.
  • HEIF onlyDepth lives in the HEIF file, so Portrait saves HEIF at 12 MP, as Apple's camera does, and the format choice is set aside.
  • Your look still appliesThe film simulation, grain and halation are developed into the portrait like any other shot.
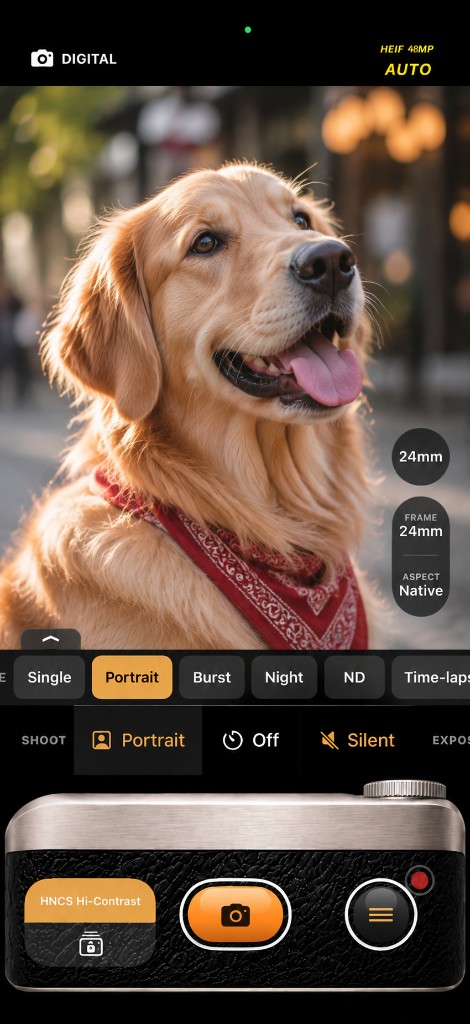
SimCam in Portrait: a sharp golden retriever against a blurred street, HEIF 48MP on Auto, 24 mm lens and frame, native aspect, and the HNCS Hi-Contrast look under the shutter
SHOT 14 Portrait in the viewfinder. The dog is sharp and the street behind falls soft. The drive dial is on Portrait, the file reads HEIF 48MP, and the lens and frame are both 24 mm. HNCS Hi-Contrast sits under the shutter.
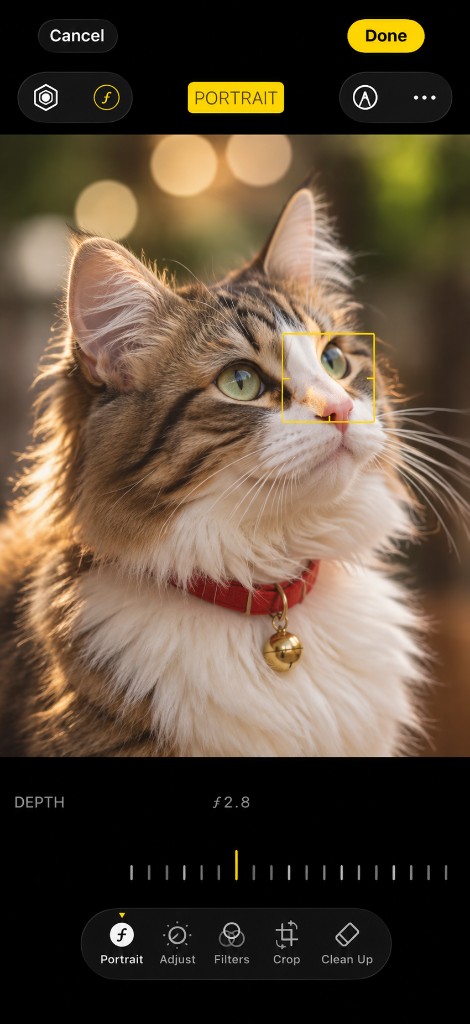
Apple Photos editing a portrait of a cat: a focus box on the nose, the depth slider at f/2.8, and Portrait, Adjust, Filters, Crop and Clean Up below
SHOT 15 Opened in Apple Photos. The focus box is on the nose, and the depth slider reads ƒ2.8, so the blur and the point of focus are still yours to change.

10

Focus, with the assistants a serious body gives you

Fine focus is a skill, and premium cameras teach it with tools. SimCam simulates that help. You turn focus by distance, the way a lens barrel is marked, then check the point the way a digital camera does: edges that peak in colour, and a zoom into the place you are trying to sharpen. The assistance is the simulation. The decision is still yours.

  • Distance scaleA focus slider marked in metres, from close focus to infinity.
  • Zoom focusingPunch in on the focus point, as on a real digital camera, and see whether it's sharp.
  • Focus peakingSharp edges light up in the colour you choose.
  • Clipping warningsBlown highlights and crushed shadows are flagged on the live view.
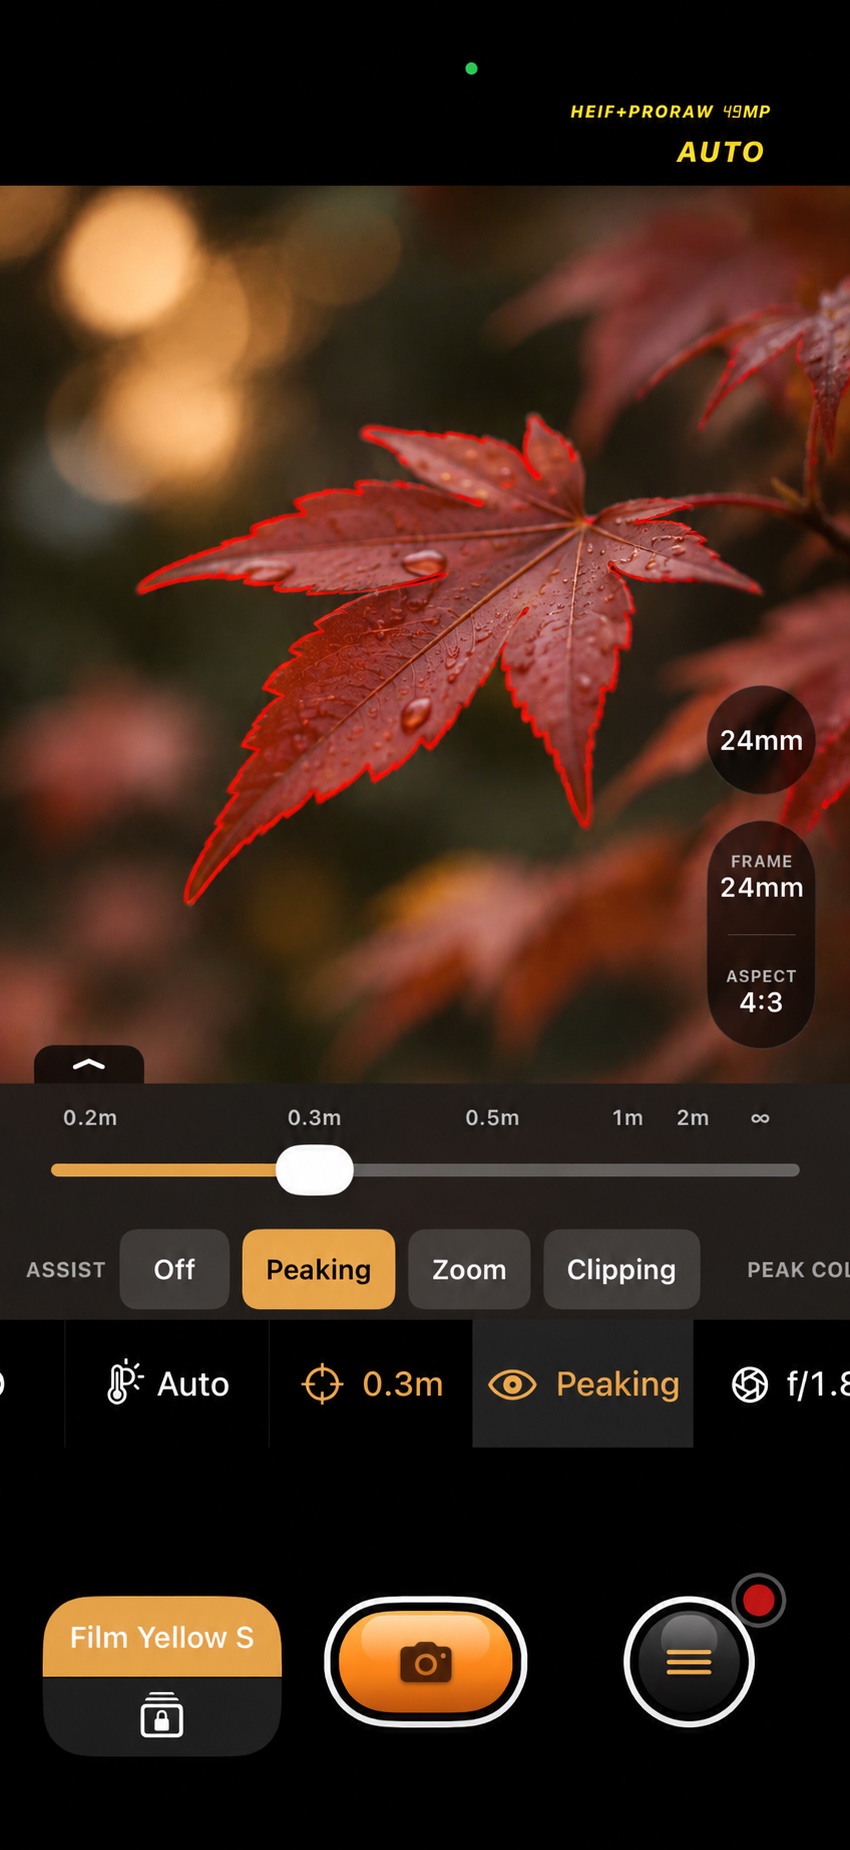
SimCam in manual focus on a maple leaf: the distance slider at 0.3 m with red focus peaking tracing the sharp edges of the leaf
SHOT 16 Manual focus on a maple leaf. The distance slider is set to 0.3 m, and red peaking traces the edges of the leaf that are in sharp focus while the background melts into soft bokeh.

11

Framing, the way a body helps you see

Levels and grids are the small instruments a camera puts in the finder so you can hold a horizon and a proportion. SimCam simulates those, then adds a guide that reads the scene and suggests a stronger frame. It runs on the phone. The picture is still the one you decide to take.

  • Three levelsChoose the leveler your camera had: a horizon line, a floating ball, or two spirit-level tubes for roll and tilt.
  • Grid linesComposition grids drawn on the picture, just like many digital cameras.
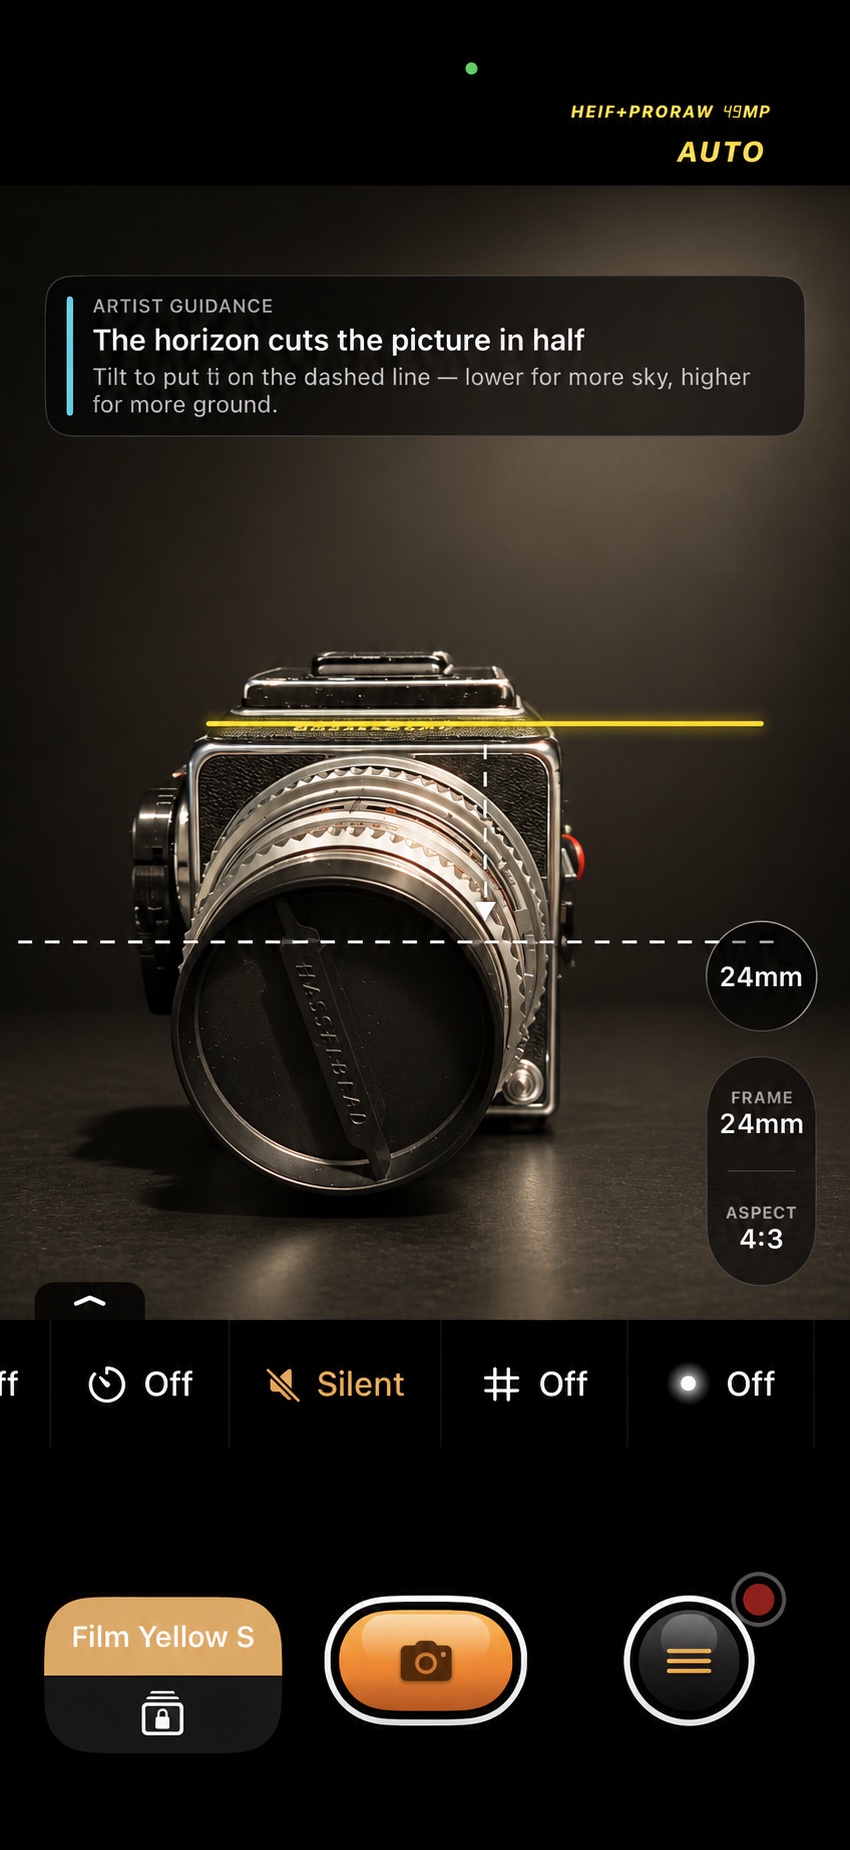
  • AI artist guideFinds leading lines and where they meet, the horizon and the third it belongs on, your subject and where it should go, frames within the frame, symmetry and open space, and draws the tip over the live view.
  • On-deviceRuns on Apple's Vision framework. No frame ever leaves the phone.
SimCam's AI artist guide on a vintage medium-format camera: a guidance card says the horizon cuts the picture in half, with a yellow line where the horizon is and a dashed line with an arrow where it should go
SHOT 17 The AI artist guide at work. A card at the top says what it sees: here, that the horizon cuts the picture in half, and how to fix it. The viewfinder draws the tip too: a yellow line where the horizon is now, and a dashed line with an arrow where it should go.

12

Craft that used to live in the camera

Some of the pleasure of a film camera was what it could do before you ever reached a darkroom. A second exposure laid over the first. A date burned into the corner. A contact sheet of the whole roll. SimCam simulates those gestures in the camera, so the handling includes the finish.

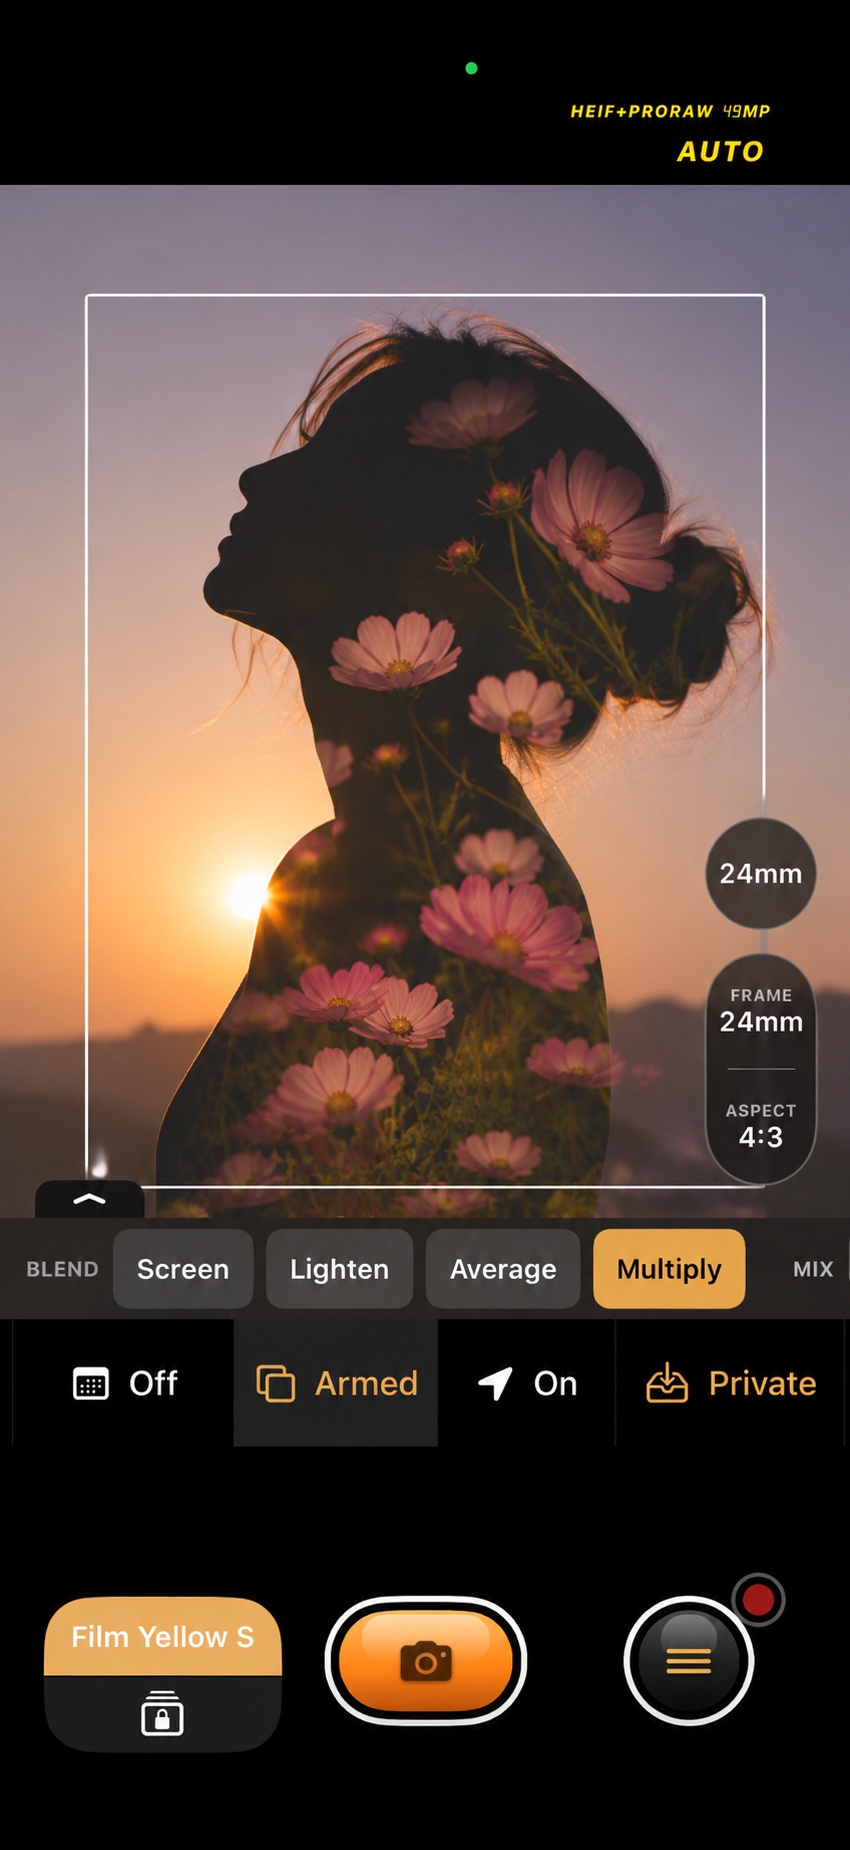
  • Double exposureLay a chosen picture over your next shot, previewed live. Blend with Screen (as on film), Lighten, Average or Multiply.
  • Date & time stampThe orange data-back stamp, in Y M D, D M Y or M D Y order, with or without the time, in the left or right corner.
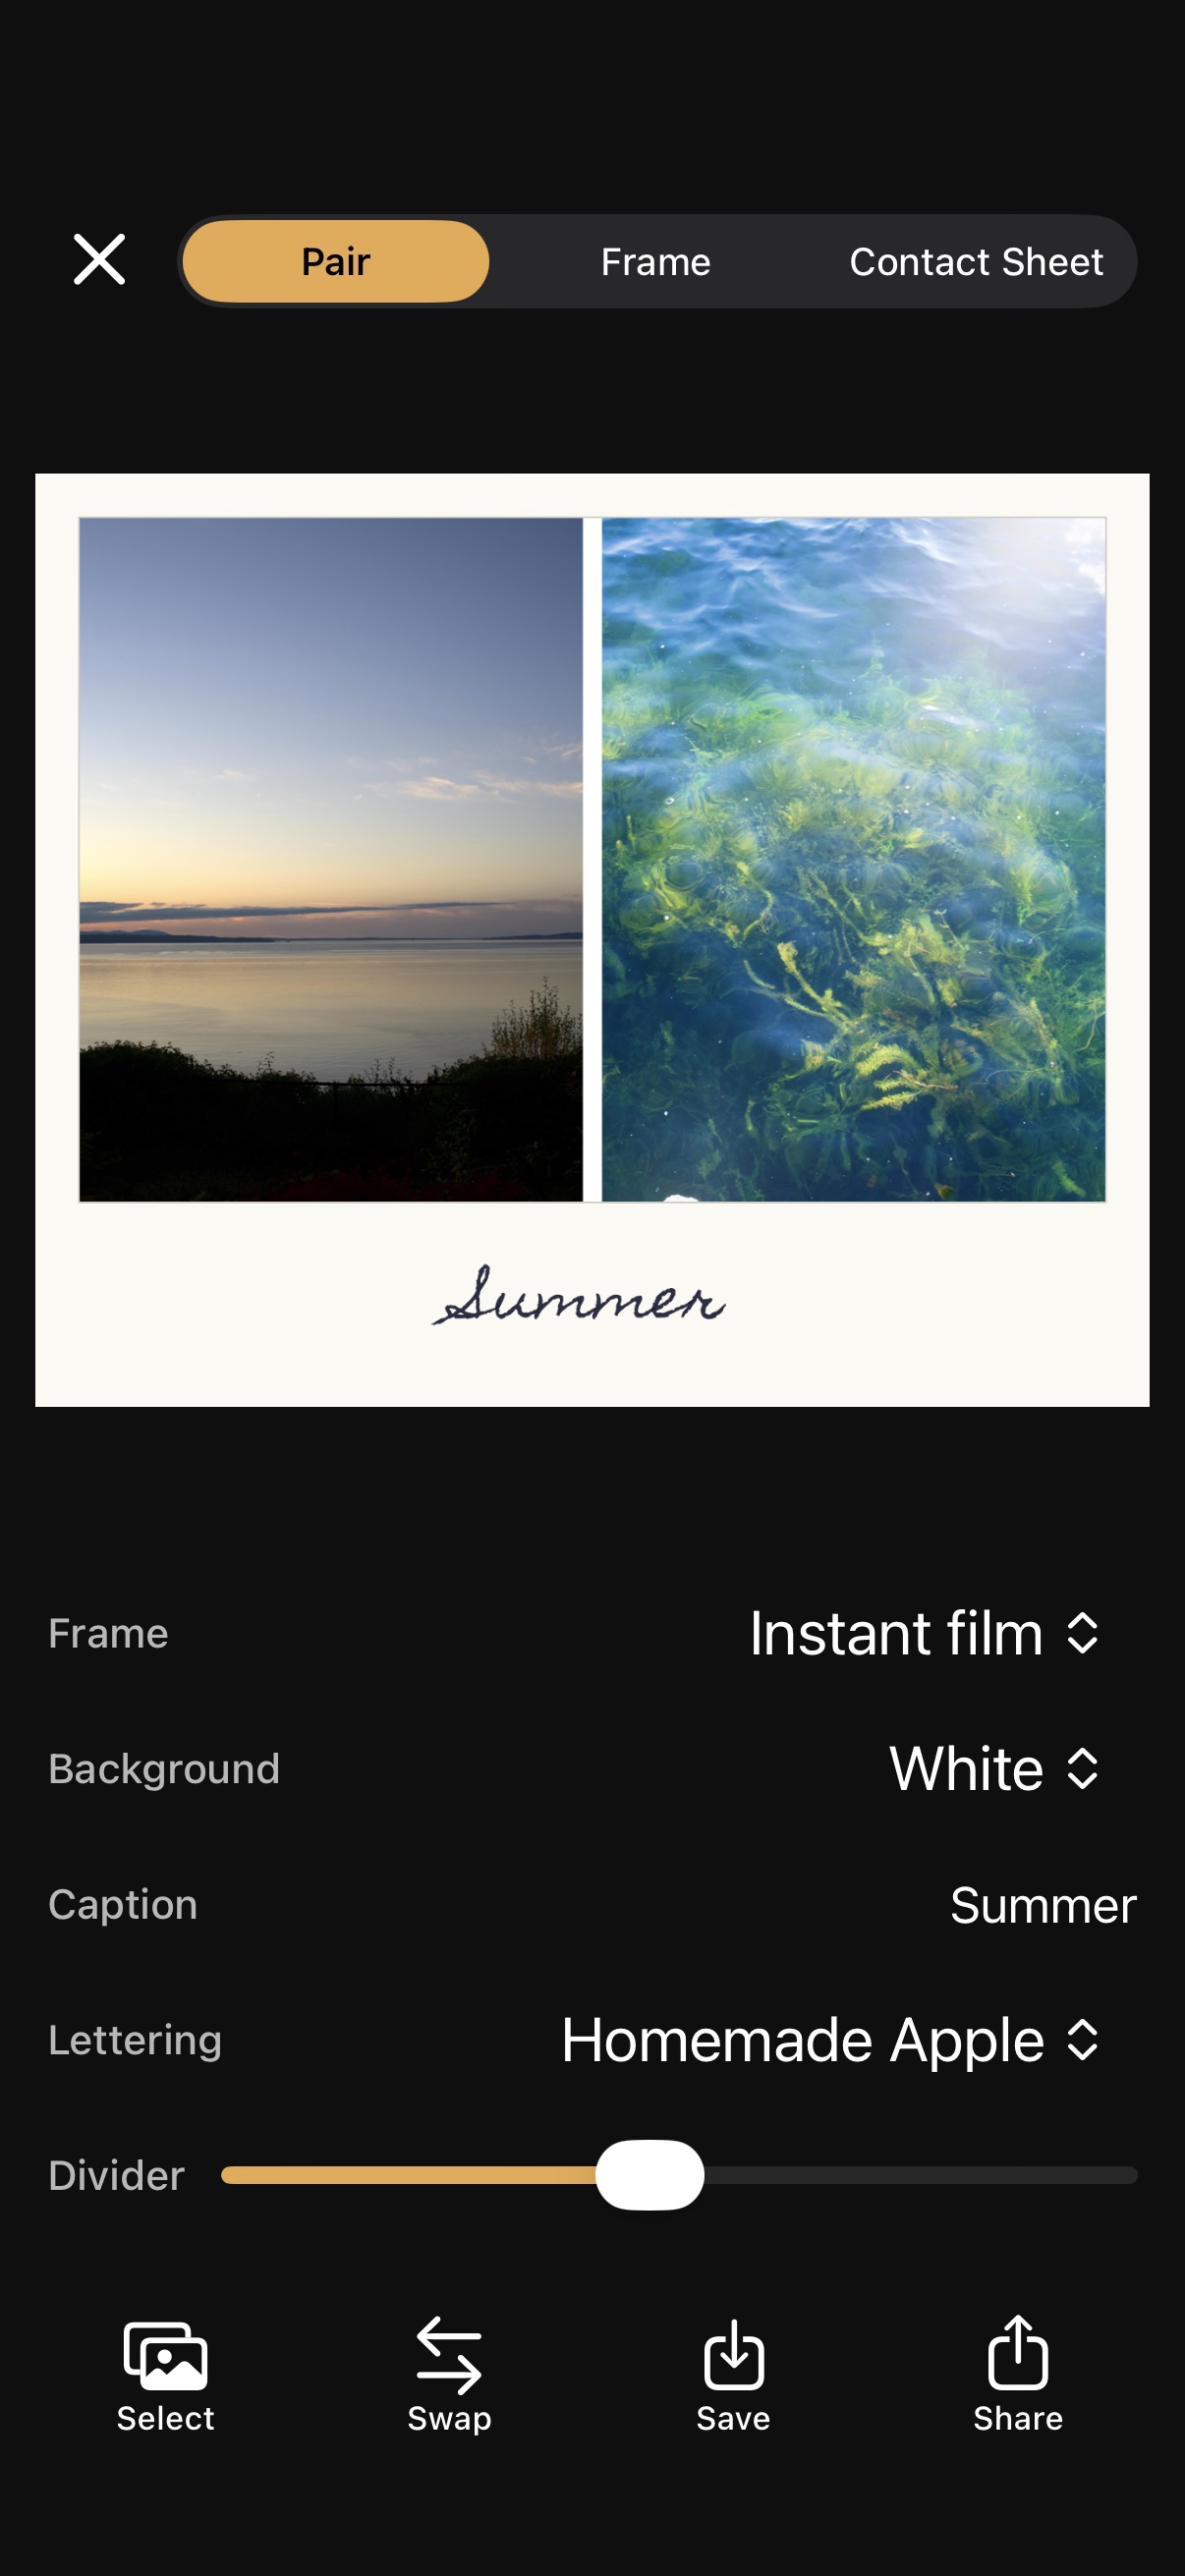
  • Frame studioTurn library shots into prints: side-by-side half-frame pairs, framed prints and film-strip contact sheets.
  • Print stylesThin, matte, instant film, rounded, film rebate and postcard borders.
SimCam's frame studio in Pair mode: two photos side by side in a white instant-film border with the handwritten caption Summer, and settings for frame, background, caption, lettering and divider
SHOT 18 The frame studio in Pair mode: two photos side by side in a white instant-film border, with the caption "Summer" handwritten underneath. Frame, background, caption, lettering and divider are all adjustable below, and Select, Swap, Save and Share are along the bottom.
SimCam with a double exposure armed: a woman's silhouette against a golden sunset filled with pink cosmos flowers, and the blend choices Screen, Lighten, Average and Multiply open, with Multiply selected
SHOT 19 Double exposure armed: a second picture of flowers laid over the silhouette against the sunset, so the flowers grow inside her outline. The blend choices are open (Screen, Lighten, Average, Multiply), with Multiply selected, and the result is previewed live in the viewfinder before you press the shutter.

13

Video, graded as you roll

Switching to video is another machine: the full 16:9 frame, the look graded into the clip as it records, sound running with it. The simulation is the same idea as a still. The colour belongs to the camera you are handling, at the moment you press record.

  • Full-frame 16:91080p at a steady 30 fps, even in low light. HEVC with sound.
  • Graded liveYour film look and curve are recorded straight into the file, with no grading to do afterwards.
  • Frame lines cropRecord exactly what the frame lines show.
  • Portrait or landscapeRecorded upright the way you held the phone.

14

The body you hold

A camera is a thing in the hand. Dress the body, set the meter to appear when you want it, give the shutter a sound, and put SimCam on the Lock Screen so the next picture starts with a press. The skin is a simulation of a body. The controls underneath are the simulation of using it.

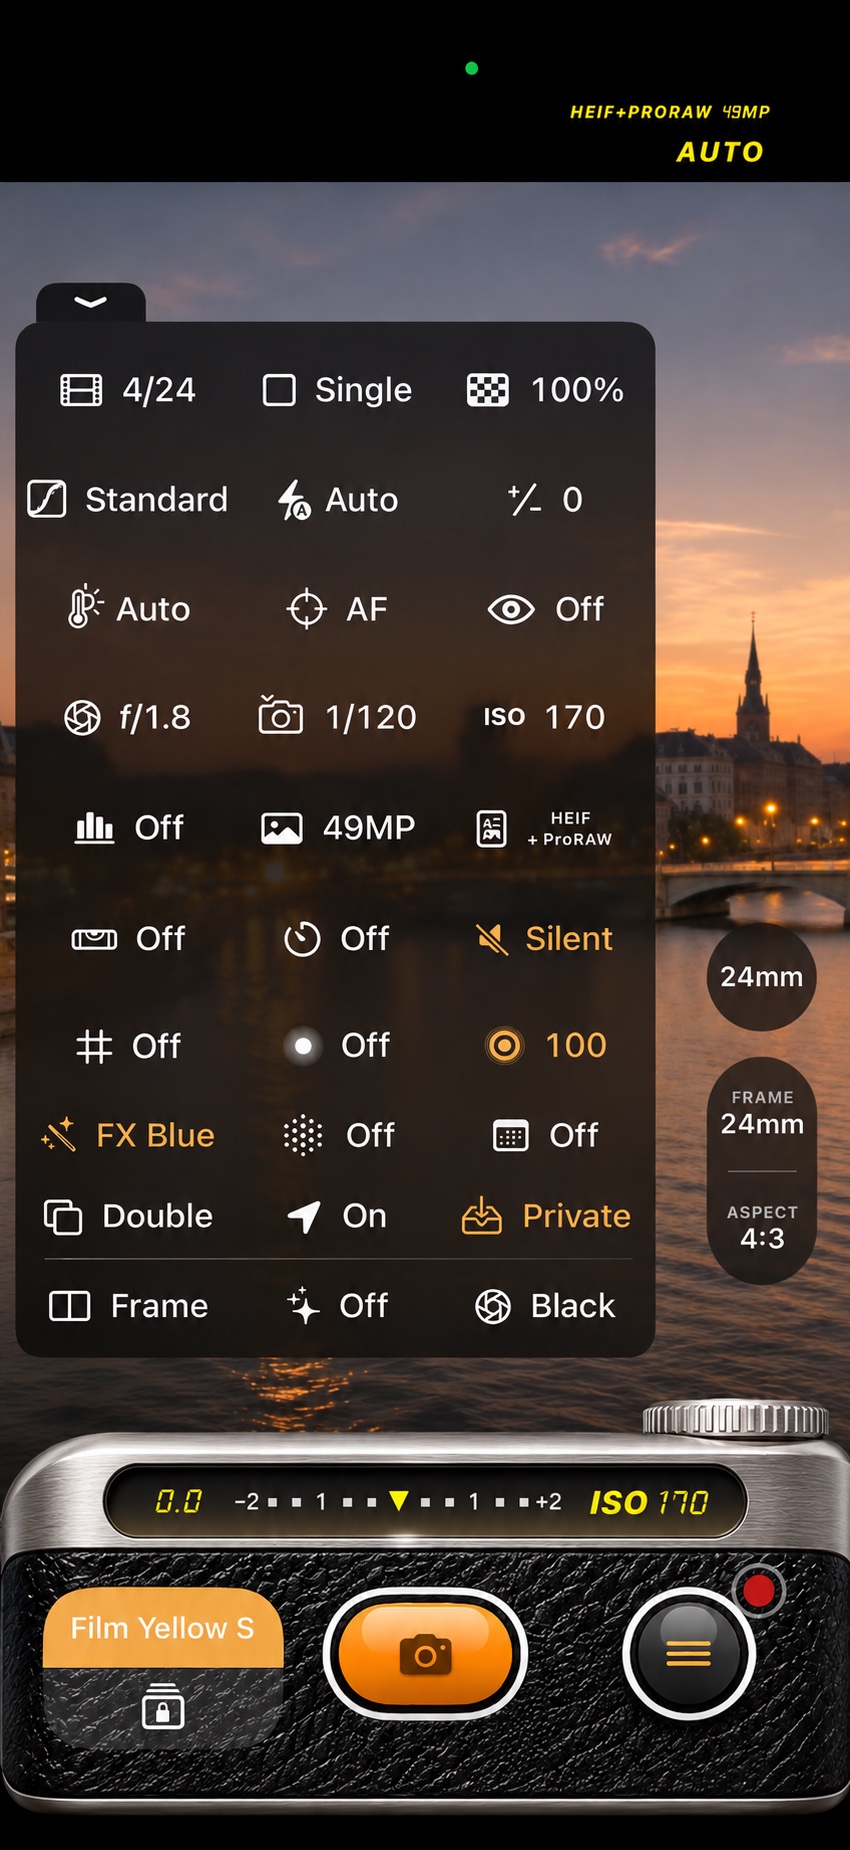
  • Every control, one gridThe main menu opens into a grid of every setting: drive, film strength, tone curve, flash, exposure compensation, white balance, focus, aperture, shutter, ISO, histogram, output, level, timer, sound, grid, artist guide, bloom, halation, diffusion, vignetting, grain, special effects, date stamp, double exposure, location, save destination, frame studio, theme, and About.
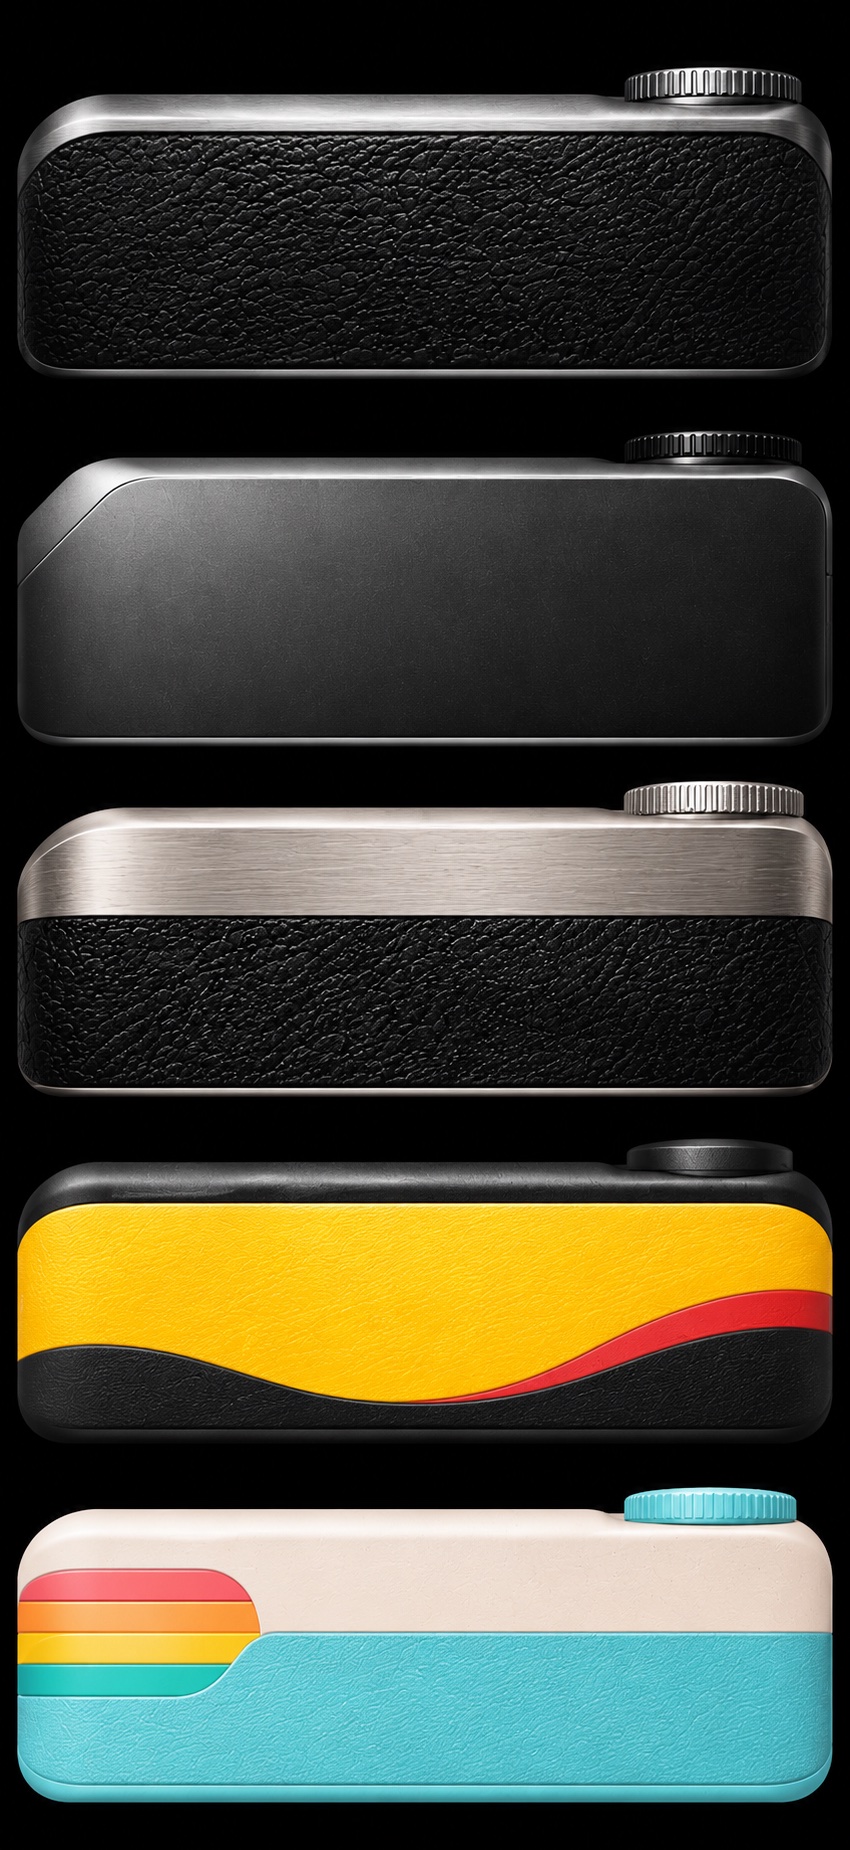
  • Body skinsClassic, Modern, Retro, Disposable, Toy, Story or plain Black. The same skin in portrait and landscape, sized for the phone in your hand.
  • Meter behaviourKeep the metering bar always on, or have it appear only while you change exposure.
  • Shutter soundsA mechanical click, the iPhone's own shutter, or something sillier.
  • Lock-screen cameraMake SimCam the camera button at the lower right of your Lock Screen, ready to shoot with one press.
SimCam with the main menu open: a grid of every control, from drive, tone curve and flash to aperture, shutter, ISO, grain, date stamp and theme, over a sunset river
SHOT 20 The main menu opened up: every control the camera has, in one grid. Tap any cell to change it, and cells that differ from the default light up in gold.
SHOT 21 A close-up of the Lock Screen's lower right corner. The camera button there opens SimCam, shown here with its aperture icon, instead of Apple's camera.
Five camera body skins stacked: black leather with steel, plain black, steel and black leather, yellow and red wave, and cream and teal with a rainbow stripe
SHOT 22 The camera's body skins: Classic, Black, Modern, Disposable and Toy. The same skin follows you from portrait to landscape.

15

Camera RAW Studio: bring other cameras in

SimCam's pipeline is not only for the phone. Camera RAW Studio, part of SimCam Pro, takes RAW files from the camera you already own and develops them the same way: the look, the film effects and the finish you chose, on a file that never passed through a phone's processing. One frame opens as a photo editor. Several frames from one camera stack, as Night does, into a cleaner picture or a trail of light. The originals are never touched.

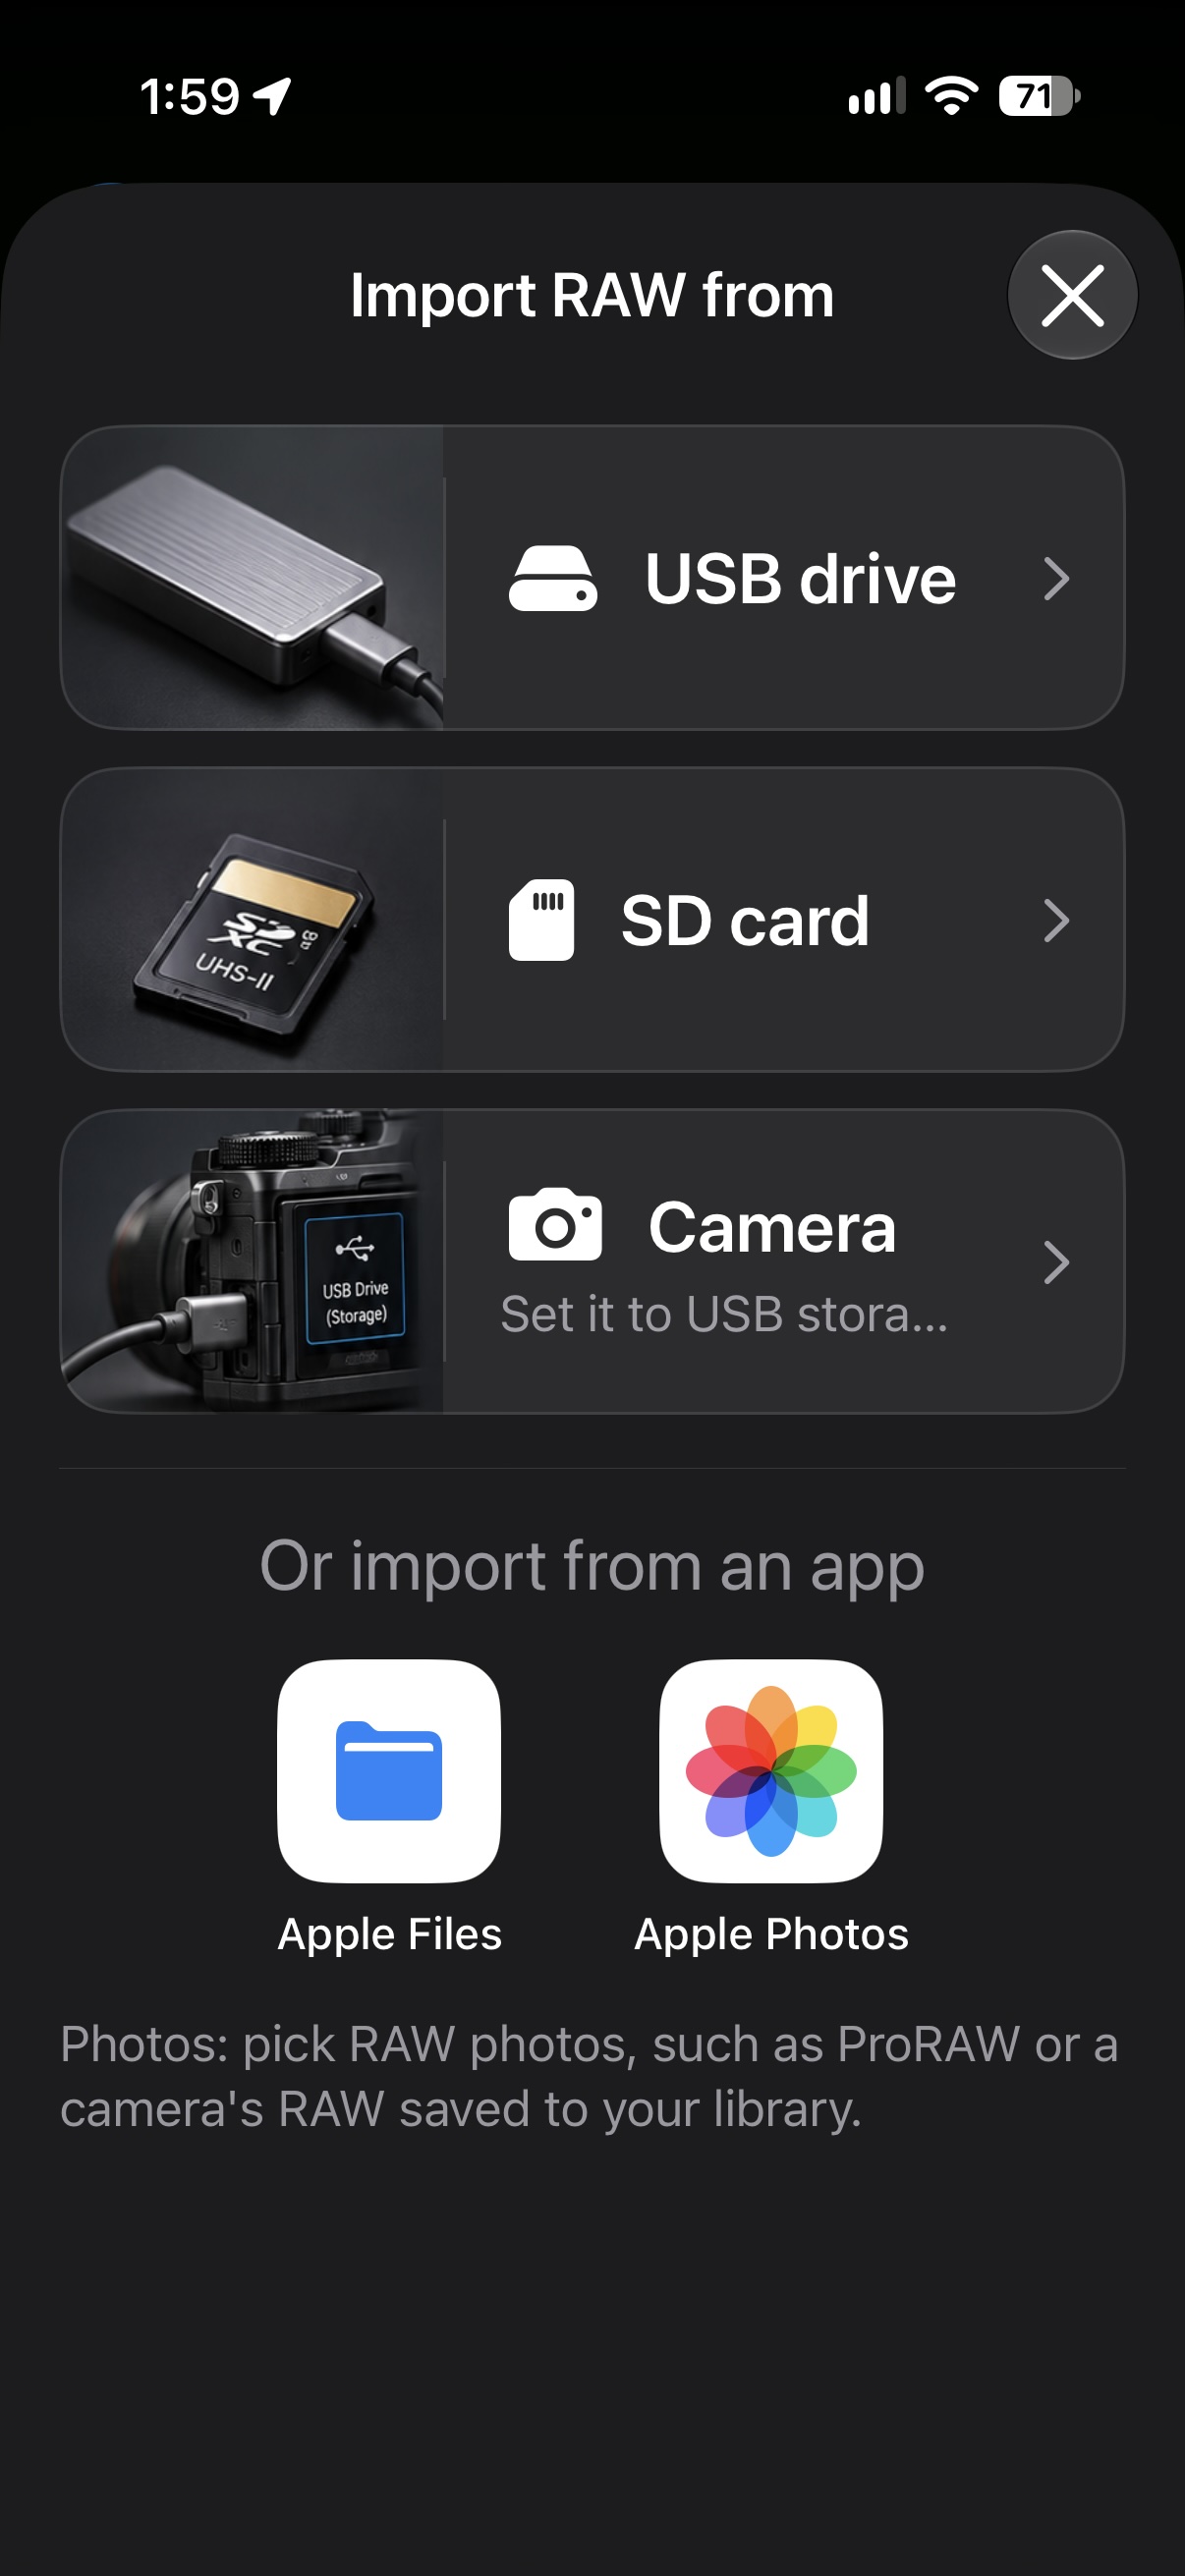
  • Import from anywhereA USB drive, an SD card in a reader, another camera over USB-C, or any folder in Files, and RAW from Apple Photos too.
  • Straight from the cameraPlug in a body such as a Fujifilm X-E5 set to USB storage mode and SimCam reads its RAW files directly, newest first, with no card reader.
  • One frame or a stackA single RAW opens in the editor. Several are aligned on their contours, shaken frames left out, and averaged, or laid with the brightest lights for light and star trails.
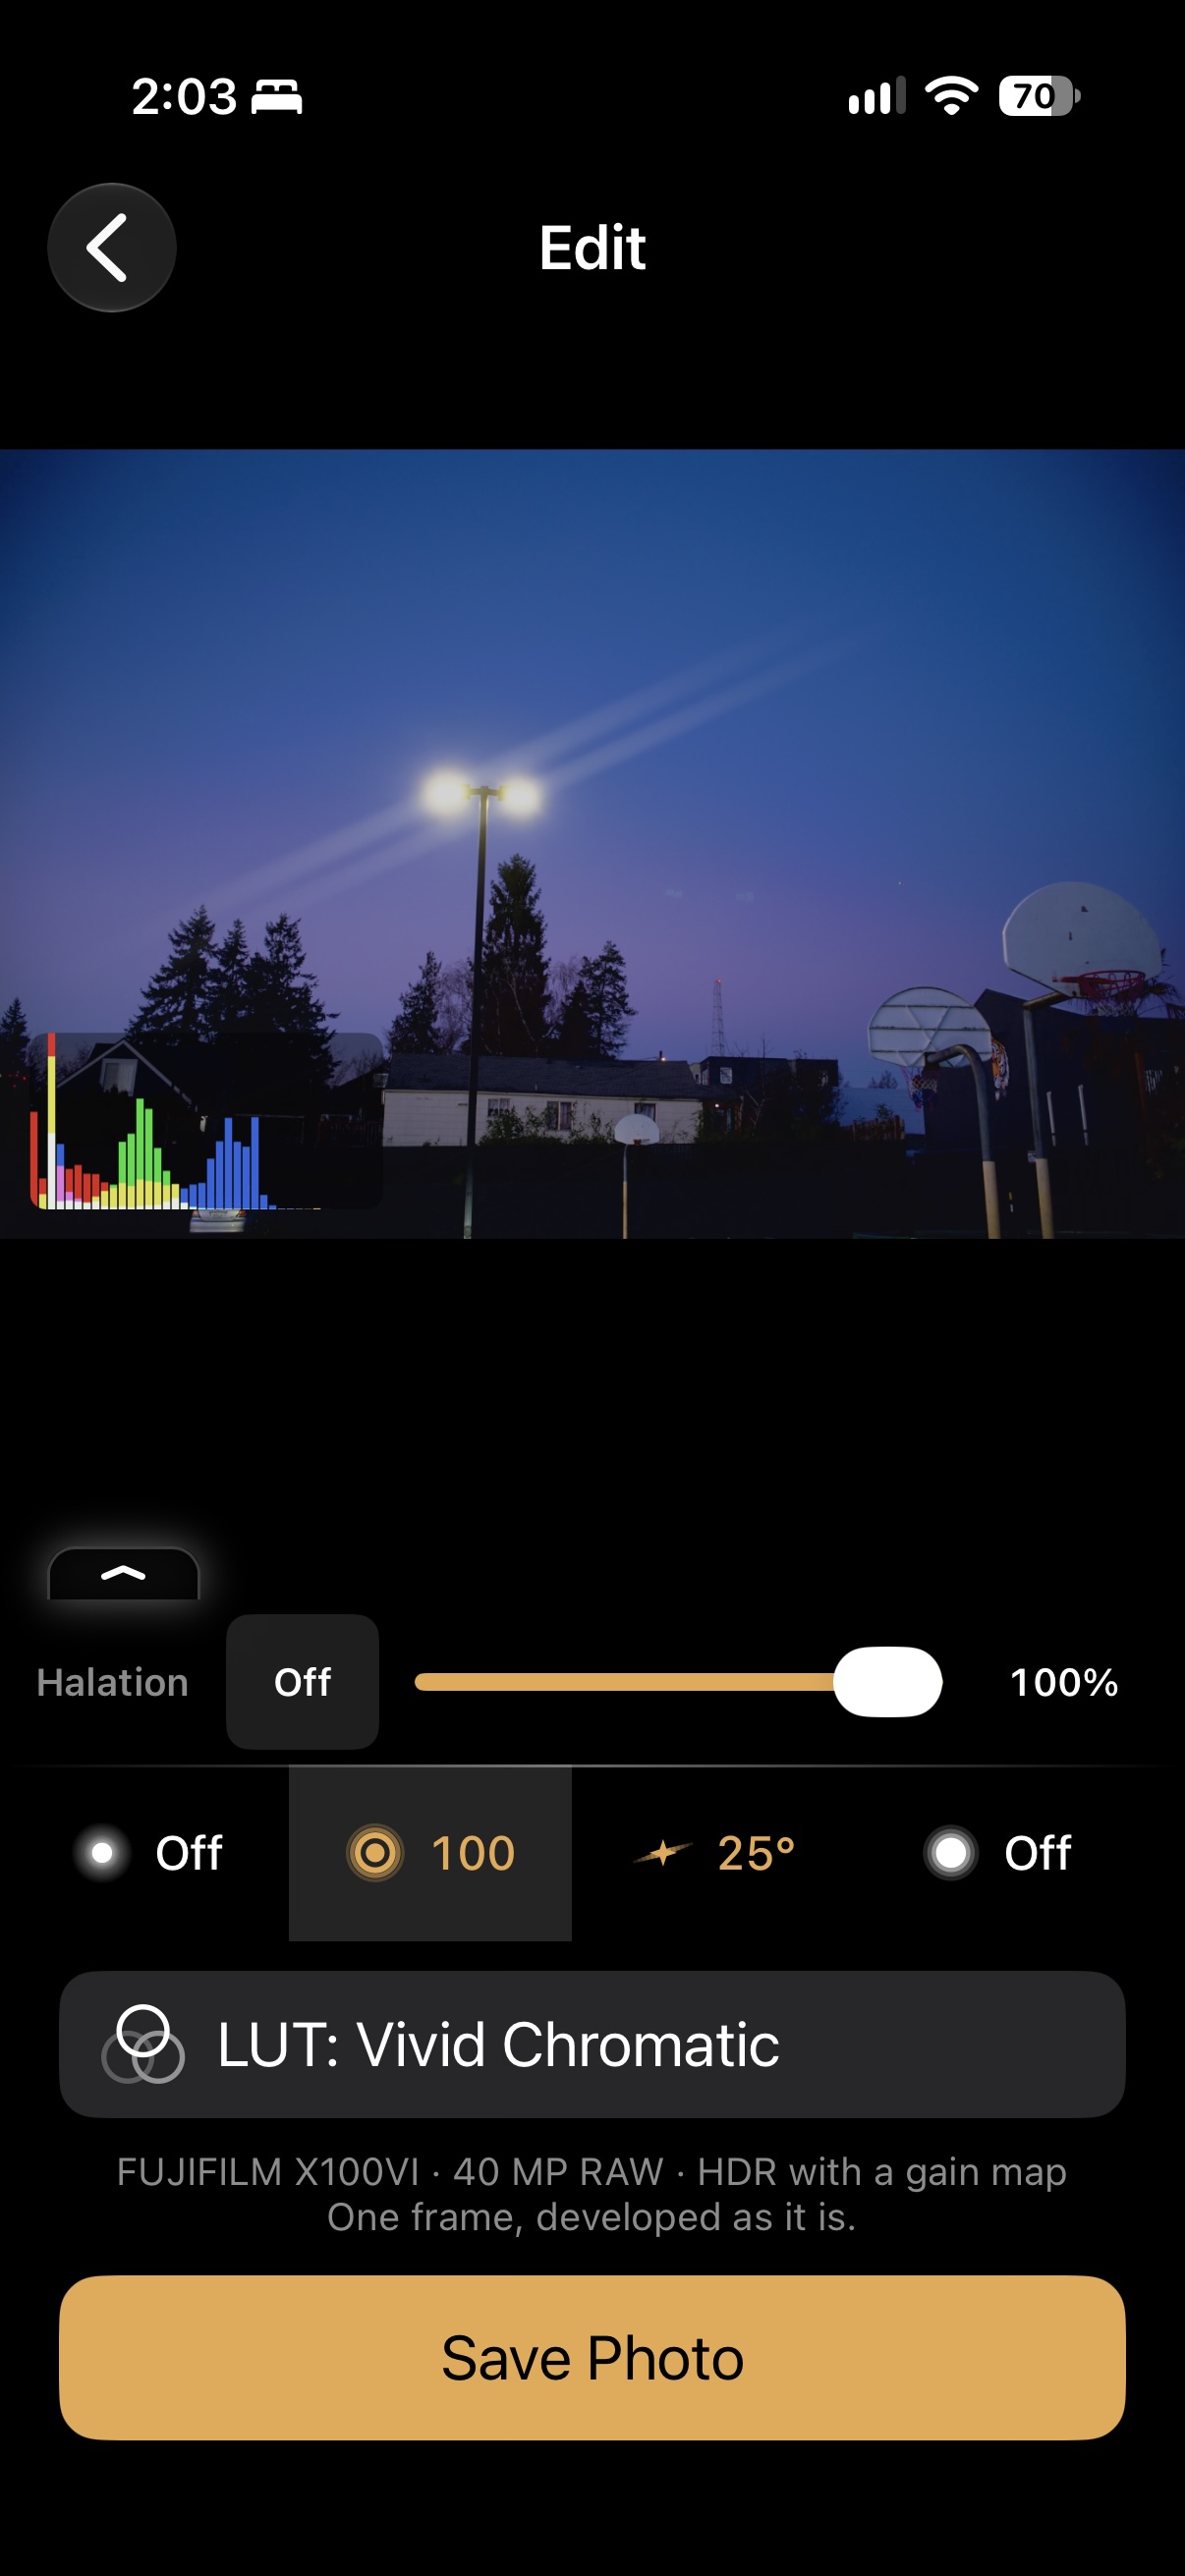
  • The camera's own controlsThe same menu as the viewfinder: LUT and its strength, film curve, white balance, exposure, bloom, halation, light trail, diffusion, vignette, grain, Color Chrome, Tilt-Shift, halftone, bitmap, date stamp and double exposure.
  • Saved like a camera fileAn HDR HEIF with a gain map on iOS 18 and later, or SDR, kept in your private library or Apple Photos. The RAW originals stay as they are.
Importing RAW file sources
SHOT 23 The Import RAW from sheet: USB drive, SD card or camera, and Apple Files or Photos below.
Studio editor
SHOT 24 The studio editor, with the camera's own menu under the picture.

Specifications

The spec sheet.

Capture
Bayer RAW (12 MP) or Apple ProRAW (Pro models, 12 or 48 MP), developed in-app
Output
HEIF · JPEG · PNG at 12, 24 or 48 MP, optionally + RAW DNG or + ProRAW DNG
Focal lengths
13 · 24 · 28 · 35 · 45 · 85 · 120 mm
Frame lines
Current lens + next three
Aspect ratios
Native · 1:1 · 4:3 · 3:2 · 16:9
Exposure
Aperture, shutter and ISO, each left on auto or pinned, ⅓-stop steps
ISO
25 – 25,600 (extended range pushed in RAW)
Metering
LED bar −2 … +2 EV, live histogram
Drive
Single · Burst · Portrait · Night · ND · Time-lapse · Video
Night
Metered: single shot under 1 s, stacked from 1 s (7 s handheld, 30 s tripod) · Average or Trails · STD 12 MP or Hi Res · HDR HEIF
Portrait
A simulated aperture-driven blur · wide and telephoto lenses · depth and mattes saved in HEIF for refocus in Photos · iOS low-light processing · 12 MP
Metadata
Aperture · shutter · ISO · focal length · distance · look values · GPS · drive mode
Film looks
140+ LUTs, custom looks, .cube export
Film effects
Halation · Bloom · Diffusion · Vignetting · Grain · Color Chrome · FX Blue · Highlight roll-off · Film curves · Light Trail · Tilt-Shift · Halftone · Bitmap
Camera RAW Studio
SimCam Pro · RAW from USB drive, SD card, camera over USB-C, Files or Photos · single-frame editor or aligned stack (Average or Trails) · HDR HEIF out
Focus
Distance scale · Zoom focusing · Peaking · Clipping
Levels
Line · Ball · Tubes
Video
1080p · 30 fps · HEVC · 16:9 · live grade
Body skins
Classic · Modern · Retro · Disposable · Toy · Story · Black
Privacy
On-device only, encrypted private library

Handle the camera.
Earn the picture.

Download on theApp Store